
Zero to Kubernetes in 2.5 Hours: A Copy-Paste kubeadm Lab for Beginners

✍️ Translate this blog into Hindi, Tamil or Telugu
Have you watched Kubernetes videos, nodded along, and still felt you could not build a cluster on your own? This guide fixes that. First you will understand what Kubernetes is and why it runs everything from food delivery apps to AI data centres. Then you will build a real 3-machine Kubernetes cluster on Google Cloud, from an empty account to apps that open in your browser, by copying and pasting one command at a time.
You do not need to know Linux. You do not need to install anything on your laptop. Every new word is explained the first time it appears, and every command comes with a short "what this does" note.
| Level | Absolute beginner. If you can copy, paste and read, you can do this. |
| Time | About 45 minutes to read Part A, about 2½ hours to do the lab in Part B |
| Cost | About US $0.13 per hour on Google Cloud, only while the lab exists |
| Tested on | 15 Nov 2026 · Ubuntu 24.04.5 LTS · Kubernetes v1.37.2 · containerd 2.4.2 · Calico v3.33.0 |
💡 Every command in the lab (Part B) was tested end to end on brand-new machines on 15 Nov 2026. The screenshots come from that test run, so what you see on your screen should look the same (only the IP addresses and random names will differ).
This guide has two halves. Part A explains, in plain words and with pictures, what Kubernetes is, why every modern company uses it, and why AI data centres depend on it. Part B is a hands-on lab: you build a real cluster and try every idea yourself.
Part A: Understand Kubernetes first
What is Kubernetes?
Start with a container. A container is a small, sealed box that holds one app plus everything that app needs to run: the code, the libraries and the settings. Because the box carries everything with it, the app runs the same way on your laptop, on a server in Chennai, or in a Google data centre.
One container is easy to run by hand. But a real product is not one container. A food delivery app, for example, has a website, a mobile API, a payments service, a search service and a database, and each of those may run as 5, 50 or 500 copies. Now ask yourself:
- Which machine should each copy run on?
- What happens at 2 AM when a copy crashes, or a whole machine dies?
- How do you add 100 more copies on a festival sale day, and remove them the next morning?
- How do you release a new version without switching the app off?
Kubernetes is the software that answers all of these questions for you. It is a container orchestrator: you tell it what you want ("keep 5 copies of my website running, reachable on port 80"), and it makes that true across a group of machines, and keeps it true. It was created at Google, made open source in 2014, and is now looked after by the Cloud Native Computing Foundation (CNCF). People often shorten it to K8s (K, then 8 letters, then s).
💡 Simple picture: think of Kubernetes as the manager of a big restaurant kitchen. You do not tell each cook what to do. You give the manager the menu for the day ("200 biryanis, 100 dosas"), and the manager assigns cooks and stoves, replaces a cook who goes home sick, and calls in extra cooks when the rush starts.
The most important idea in Kubernetes is desired state. You write down what you want in a file (you will write many of these in Part B), and Kubernetes keeps comparing "what I was asked for" with "what is really running", and fixes any difference, day and night. This is why you will see a deleted pod come back by itself in Lab 5.1.
Why Kubernetes?
Before Kubernetes, teams ran apps directly on servers, or wrote their own scripts to start containers. That works for one app on one machine. It breaks as soon as you grow. Kubernetes gives you, out of the box:
| What you get | What it means | Where you see it in this guide |
|---|---|---|
| Self-healing | A crashed container is restarted. A pod on a dead machine is recreated on a healthy one. | Lab 5.1 |
| Scaling | Change one number to run more or fewer copies. With an autoscaler, it can even follow traffic by itself. | Lab 5.2 |
| Load balancing and service discovery | Many copies share the traffic, and other apps find them by a fixed name instead of changing IP addresses. | Labs 4.1 and 5.4 |
| Rolling updates and rollback | New versions replace old ones a few at a time, with no downtime. A bad release can be rolled back. | Picture 5 below |
| Bin packing | Kubernetes fits containers onto machines so that CPU and memory are not wasted. | Lab 5.2 (pods spread over workers) |
| Same everywhere | The same YAML file works on a laptop, in your own data centre, or on AWS, Azure or Google Cloud. | All of Part B |
Why Kubernetes matters in any infrastructure workflow
Whatever your role, Kubernetes is probably somewhere in your daily work:
- Developers package their app into a container image and describe how it should run in a YAML file. They no longer need to know which server it runs on.
- DevOps and CI/CD pipelines build the image, test it, and run
kubectl apply(or a GitOps tool) to release it. Every release follows the same repeatable steps. - Operations and SRE teams get one standard way to watch, scale, update and recover every app, instead of a different script for each one.
- Security teams control who can do what (role-based access), keep passwords in Secrets, and limit which pods may talk to each other.
- Companies avoid being locked in to one cloud, because Kubernetes runs on all of them and in their own data centres.
That is why Kubernetes has become the common platform that most cloud-native tools are built on, and why Kubernetes skills appear in so many DevOps, cloud, SRE and platform engineering job descriptions.
Why AI data centres depend on Kubernetes
An AI data centre (NVIDIA calls it an "AI factory") is filled with very expensive GPU servers. A GPU (graphics processing unit) is a chip that can do thousands of small calculations at the same time, which is exactly what training and running AI models needs. These GPUs cost a lot, they are always in short supply, and many teams want to use them at once. So the data centre has three big problems to solve:
- Keep every GPU busy. An idle GPU wastes budget every minute. Someone must decide which job runs on which GPU, and give the next job the GPU the moment it is free.
- Share fairly between many teams. Research, training, testing and live chatbots all compete for the same GPUs. Jobs need queues, priorities and limits.
- Run thousands of moving parts reliably. One big training job can use hundreds of GPUs on many servers. If one server fails, the job must recover. Live AI services must scale up when users arrive and down when they leave.
These are the same problems Kubernetes was built for: scheduling work onto machines, sharing them, healing failures, and scaling. On top of that, Kubernetes is open and extensible: vendors can teach it new tricks with add-ons. That is why the main GPU and AI tools are built to run on Kubernetes. As one public example, OpenAI has written about running Kubernetes clusters with thousands of nodes for its research work.
How AI data centres use Kubernetes
Here is how the pieces fit together in a typical GPU cluster, in simple words:
| Job in the AI data centre | How Kubernetes does it |
|---|---|
| Make GPUs visible | The NVIDIA GPU Operator installs the GPU driver and tools on every GPU node. Its device plugin tells Kubernetes "this node has 8 GPUs", so a GPU becomes a resource you can ask for, just like CPU and memory. |
| Ask for a GPU | A pod simply says nvidia.com/gpu: 1 in its YAML, and the scheduler only puts it on a node with a free GPU (example below). |
| Train big models | Tools such as the Kubeflow Training Operator run one training job as many pods on many GPU nodes at once (for example a PyTorchJob). Batch schedulers such as Kueue or Volcano add queues and "start all the pods together or none at all" (gang scheduling). |
| Serve models to users | Inference servers such as NVIDIA Triton, vLLM or KServe run as pods behind a Service. More users means more pods; a new model version rolls out with a rolling update. |
| Fast networking between GPUs | The NVIDIA Network Operator sets up high-speed InfiniBand or RoCE networks, so GPUs on different servers can exchange data quickly during training. |
| Watch GPU health | DCGM Exporter sends GPU temperature, memory and usage to dashboards (Prometheus and Grafana), so the team spots a failing GPU early. |
This is what a GPU request looks like. It is the same kind of pod YAML you will write in Part B, plus one resources line:
# Example only: needs a cluster with NVIDIA GPU nodes and the GPU Operator. It is not part of this lab.
apiVersion: v1
kind: Pod
metadata:
 name: gpu-test
spec:
 restartPolicy: Never
 containers:
 - name: cuda
 image: nvidia/cuda:12.4.1-base-ubuntu22.04
 command: ["nvidia-smi"]
 resources:
 limits:
 nvidia.com/gpu: 1
Want to go deeper into GPU clusters? The Enterprise AI Factory course covers designing and running GPU-based AI factories.
🧠 The good news for beginners: an AI data centre uses the same building blocks you will learn in Part B: pods, namespaces, labels, services and ReplicaSets. GPUs are "just" one more resource. Learn the basics well, and AI infrastructure is the next step, not a different world.
Kubernetes architecture, explained with 5 pictures
A Kubernetes cluster has two kinds of machines:
- The control plane (often called the master node): the brain. It stores the desired state, decides where things run and keeps checking.
- The worker nodes: the muscle. They actually run your apps inside pods.
The 5 pictures below show this from different angles. For each part we give a plain meaning and a simple example. Every part named here appears again in Part B, where you will see it running.
Picture 1: The big picture
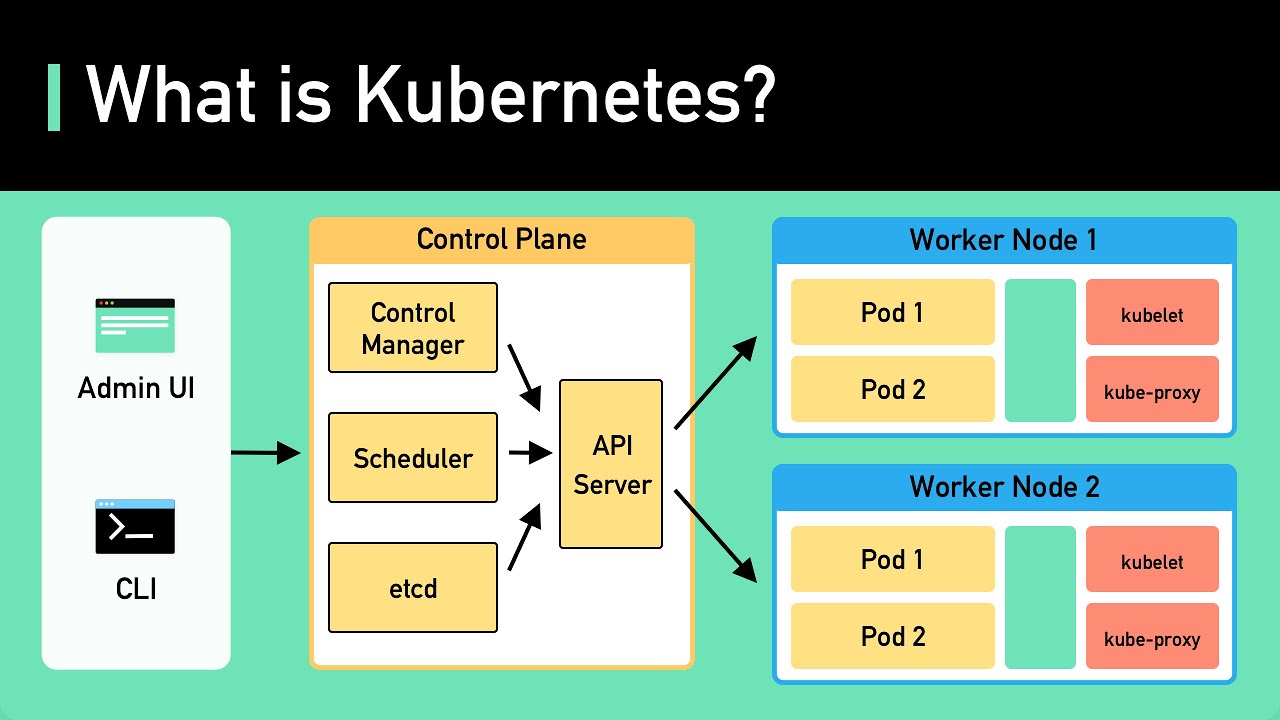
| Part | Plain meaning | Simple example |
|---|---|---|
| Admin UI and CLI | The two ways people talk to the cluster: a web dashboard, or a command line tool (kubectl). |
In Part B you type kubectl get nodes. That is the CLI. |
| Control Plane | The brain of the cluster. It never runs your app; it manages the machines that do. | The restaurant manager's office. |
| API Server | The front door. Every request, from you, from the other control-plane parts and from every node, goes through it. | You run kubectl apply -f 1-singlepod.yaml; the API server receives it, checks it, and saves it. |
| etcd | The cluster's memory: a small, very reliable database that stores the desired state of everything. | It remembers "a pod called webserver should exist in the twitter namespace". |
| Scheduler | Picks the best worker node for each new pod, based on free CPU, memory and rules. | In Lab 3.4 it placed your webserver pod on k8s-worker2. |
| Control Manager (Controller Manager) | A set of robots ("controllers"), each watching one kind of object and fixing any difference from the desired state. | You ask for 4 pods and one dies; the ReplicaSet controller creates a new one (Lab 5.1). |
| Worker Node 1 and 2 | The machines that run your apps. | k8s-worker1 and k8s-worker2 in Part B. |
| Pod 1, Pod 2 | The running app copies on each node. A pod wraps one or more containers. | The nginx web server pod in Lab 3.4. |
| kubelet | The agent on every node. It receives "run this pod here" and makes sure the containers are running and healthy. | The shift supervisor in each kitchen who makes sure the assigned dishes are actually cooking. |
| kube-proxy | Runs on every node and sets up the network rules that send traffic for a Service to the right pods. | In Lab 4.2 you opened port 30080 on a node with no web pod, and kube-proxy still forwarded you to the right one. |
| Green box (no label) | Not named in this picture. On a real node, the remaining part next to kubelet and kube-proxy is the container runtime, which actually starts the containers. | In Part B the runtime is containerd (Step 5). |
Follow one request through Picture 1: you type a command in the CLI → the API Server checks it and saves it in etcd → the Scheduler picks a worker → the kubelet on that worker asks the container runtime to start the container → kube-proxy makes it reachable → the Controller Manager keeps watching that it stays that way.
Picture 2: Inside the master node and the worker nodes
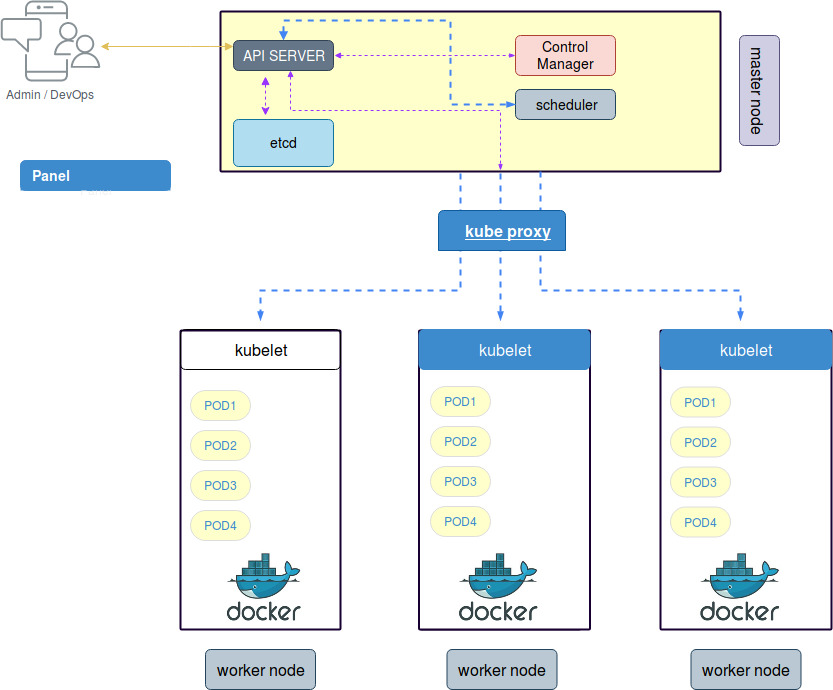
| Part | Plain meaning | Simple example |
|---|---|---|
| Admin / DevOps | The people who manage the cluster. The two-way arrow means they send commands and get answers back. | You, typing kubectl on k8s-master. |
| Master node | The machine that runs the control plane. | k8s-master in Part B. |
| API SERVER | The front door (see Picture 1). The dotted arrows show that etcd, the control manager and the scheduler all talk through it, never to each other directly. | The scheduler does not write to etcd itself; it tells the API server "put this pod on worker2", and the API server saves it. |
| etcd | The memory of the cluster. Only the API server reads and writes it. | If etcd is lost without a backup, the cluster forgets everything it was running. That is why real teams back it up. |
| Control Manager | The robots that keep the desired state (see Picture 1). | Node controller: if a worker stops answering, it marks the node "NotReady" and its pods get replaced elsewhere. |
| scheduler | Chooses a worker node for each new pod. | 4 new pods: 2 on worker1, 2 on worker2, just like Lab 5.2. |
| kube proxy | Here it is drawn once, between the master and the workers. In a real cluster, kube-proxy runs on every node, as a pod (you can see kube-proxy-... pods in Part 2, Step 10). |
When a request hits port 30080 on any node, that node's own kube-proxy forwards it. |
| worker node | A machine that runs pods. This picture shows 3. | Part B has 2 workers. |
| kubelet | The node agent (see Picture 1). The dotted lines from the master show it takes orders from the API server. | When you delete a pod, the kubelet on that node stops its containers. |
| POD1 to POD4 | The pods running on each worker. | The 4 httpd pods of Lab 5.2. |
| docker | The container runtime on each worker. This picture is from the time when Docker was the usual runtime. Since Kubernetes v1.24, Docker Engine is no longer supported directly; clusters use containerd or CRI-O. Images built with Docker still work everywhere. | Part B installs containerd only (Step 5). |
Picture 3: The 6 levels of Kubernetes
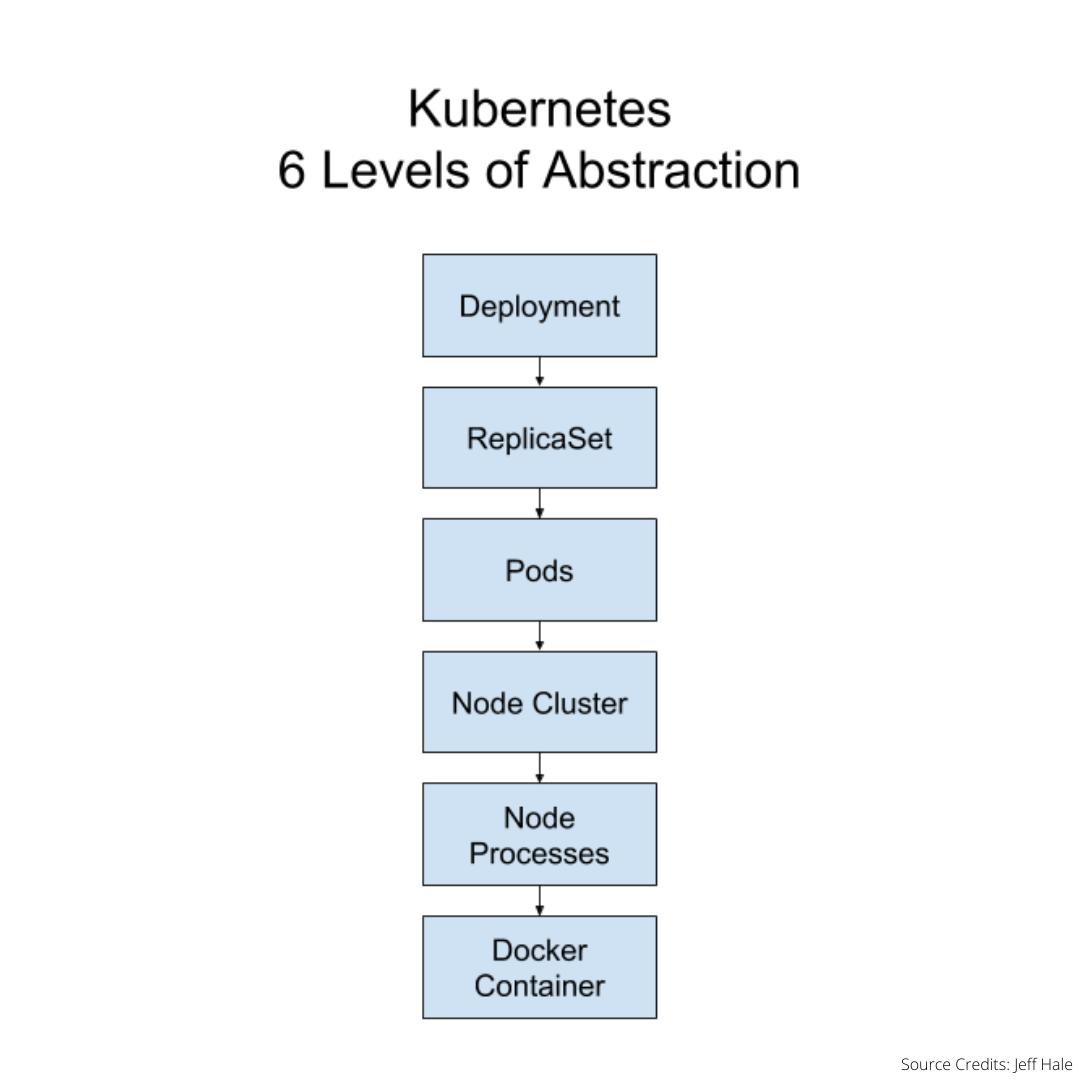
Read this picture from top to bottom. Each level manages the level below it.
| Level | Plain meaning | Simple example |
|---|---|---|
| 1. Deployment | What you usually create in real projects. It describes your app and its version, and manages ReplicaSets for you, so it can do rolling updates and rollbacks. | kubectl create deployment hello --image=nginx:1.29 --replicas=2 in Part 2, Step 14. |
| 2. ReplicaSet | Keeps an exact number of identical pods running. | replicas: 4 in Lab 5.2. |
| 3. Pods | The running copies of your app, each with its own IP address. | httpd-replicaset-57wzh, with IP 192.168.19.78. |
| 4. Node Cluster | The group of machines the pods are spread over. | Your 3-node cluster: k8s-master, k8s-worker1, k8s-worker2. |
| 5. Node Processes | The programs on each node that keep pods alive: kubelet, kube-proxy and the container runtime. | systemctl is-active containerd printing active in Step 6. |
| 6. Docker Container | The actual app process, started from an image. Today it is usually run by containerd, not Docker (see Picture 2). | The nginx 1.29 container inside your webserver pod. |
💡 Simple example of all 6 levels: you ask for a Deployment "website, 3 copies" → it creates a ReplicaSet "keep 3" → the ReplicaSet creates 3 Pods → the scheduler spreads them over the Node Cluster → on each node, the Node Processes (kubelet + containerd) start → the Container (nginx) runs and serves the page.
Picture 4: Deployment, ReplicaSet and Pod, one inside the other
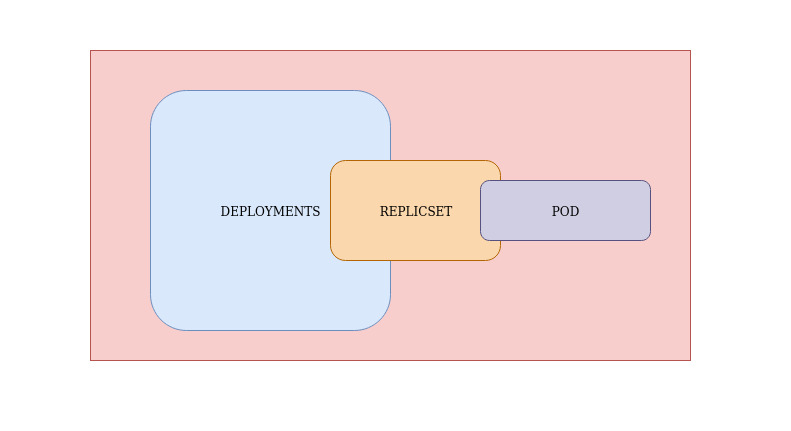
| Part | Plain meaning | Simple example |
|---|---|---|
| Outer box | Your app as a whole. | The "website" of the food delivery app. |
| DEPLOYMENTS | The owner at the top. You change the Deployment (for example a new image version), and it takes care of the rest. | Change nginx:1.28 to nginx:1.29 in the Deployment, and every pod is replaced step by step. |
| REPLICASET (written "REPLICSET" in the picture) | Created and owned by the Deployment. It keeps the pod count right. | Lab 5.3: the ReplicaSet deleted the extra pod that copied its label. |
| POD | Created and owned by the ReplicaSet. The smallest unit that actually runs. | Lab 5.3 shows the owner of each pod with -o custom-columns=...OWNER.... |
The picture shows who owns whom. Delete a Pod, and its ReplicaSet makes a new one. Delete the ReplicaSet, and its Pods go too. Delete the Deployment, and everything under it goes. You prove this yourself in Lab 5.1.
Picture 5: How a Deployment rolls out and rolls back
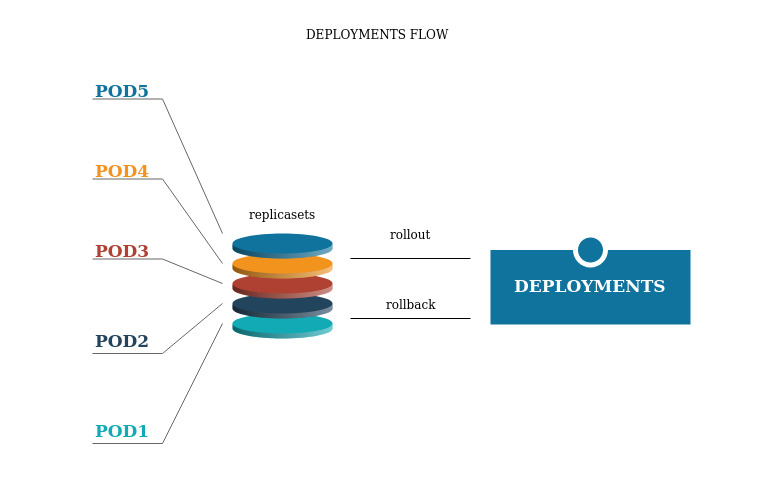
| Part | Plain meaning | Simple example |
|---|---|---|
| DEPLOYMENTS | Manages releases of your app. | Your website Deployment. |
| replicasets (the stack of coloured discs) | Each time you change the app's version, the Deployment creates a new ReplicaSet for it and keeps the old ones as history. | Version 1 = one ReplicaSet, version 2 = a second ReplicaSet. |
| POD1 to POD5 | The pods created by the current ReplicaSet. | 5 copies of the website. |
| rollout | Releasing a new version: the new ReplicaSet grows a few pods at a time while the old one shrinks, so users never see the site go down. | kubectl set image deployment/website web=nginx:1.29, then watch with kubectl rollout status deployment/website. |
| rollback | Going back to the previous version if the new one is broken: the Deployment simply scales the old ReplicaSet back up. | kubectl rollout undo deployment/website |
🪤 Beginner trap: these rollout commands need a Deployment. A plain ReplicaSet (Lab 5.1 to 5.4) does not do rolling updates, which is exactly why real projects use Deployments. Learning ReplicaSets first makes Deployments easy.
Questions every Kubernetes learner asks
These are the questions we hear most from students and career-switchers, with short answers and simple examples.
Is Kubernetes the same as Docker? No. Docker is a tool to build and run one container on one machine. Kubernetes manages many containers across many machines. Simple example: Docker is one cook with one stove; Kubernetes is the manager running the whole kitchen. You often use both: Docker (or a similar tool) to build the image, Kubernetes to run it at scale.
What is the difference between a container and a virtual machine (VM)? A VM pretends to be a whole computer, with its own full operating system, so it is big (gigabytes) and slow to start (minutes). A container shares the host's operating system and carries only the app and its libraries, so it is small (megabytes) and starts in seconds. Simple example: a VM is a whole house; a container is a room in an apartment block that shares the building's water and electricity. In Part B, your 3 machines are VMs, and your apps run as containers inside them.
What is the difference between a pod and a container? A container is the app. A pod is a thin wrapper around one or more containers that must live together, sharing one IP address and the same storage. Most pods have one container. Simple example: Lab 3.5 runs a web server and a database as 2 containers inside 1 pod.
Is Kubernetes free? Yes. Kubernetes is open source and free to use. You pay only for the machines it runs on (in Part B, about US $0.13 per hour on Google Cloud) or, on managed services, for the provider's service.
What is the difference between kubeadm, minikube and GKE / EKS / AKS? - kubeadm builds a real multi-machine cluster on servers you control. That is what Part B uses, so you see every part. - minikube and kind run a small practice cluster on your own laptop. Great for quick tests. - GKE, EKS and AKS are "managed Kubernetes" from Google, Amazon and Microsoft: the provider runs the control plane for you. Most companies use these in production. Simple example: kubeadm is building your own car to learn how the engine works; GKE is leasing a car with free servicing.
Do I need to know programming to learn Kubernetes? No. You need basic Linux commands and the ability to read YAML files. This guide explains both as you go. Programming helps later, when you build your own apps or automation.
What is YAML?
A simple text format for settings, built from key: value lines, where spaces at the start of a line matter (they show what belongs to what). Every Kubernetes object in Part B is a small YAML file. Simple example: replicas: 3 means "keep 3 copies".
What is a namespace, and why use one?
A folder inside the cluster that keeps apps or teams apart, so two teams can each have an app called web without a clash. Simple example: Part B uses the namespaces twitter and facebook as two separate "teams".
Deployment, ReplicaSet, StatefulSet, DaemonSet: which one when?
- Deployment: for normal apps where every copy is the same (websites, APIs). The most used one.
- ReplicaSet: keeps a pod count; Deployments create it for you.
- StatefulSet: for apps where each copy needs its own name and its own disk, such as databases.
- DaemonSet: runs exactly one pod on every node, such as calico-node and kube-proxy in Part B.
What happens if a worker node dies?
Kubernetes marks it NotReady. After a short wait, the pods that were managed by a ReplicaSet or Deployment are recreated on the healthy nodes. Your users may not notice at all if you run more than one copy.
What happens if the master (control plane) dies? The apps already running on the workers keep running, but you cannot change anything (no new pods, no scaling, no healing) until the control plane is back. That is why production clusters run 3 control-plane nodes, and why managed services like GKE run it for you.
How many nodes do I need? For learning, 1 machine (minikube) or 3 small VMs (Part B) is enough. Production clusters usually have 3 control-plane nodes and as many workers as the apps need, from a handful to thousands.
When should I NOT use Kubernetes? For a small website or a single simple app, Kubernetes can be more work than it saves. A simple hosting service or one VM may be enough. Kubernetes pays off when you have many services, many copies, frequent releases, or many teams.
Can Kubernetes run databases? Yes, with StatefulSets and PersistentVolumes (storage that outlives a pod). Many teams still prefer a managed database service for important data. Lab 3.7 gives you a first taste with a PostgreSQL pod.
What is Helm? A package manager for Kubernetes. Instead of writing 10 YAML files to install an app, you install a ready "chart" with one command. Simple example: like installing an app from an app store instead of copying its files by hand.
Which jobs need Kubernetes skills? DevOps engineer, cloud engineer, site reliability engineer (SRE), platform engineer, and more and more MLOps and AI infrastructure engineers, because AI platforms run on Kubernetes too.
Which certifications can I take? The CNCF and the Linux Foundation offer KCNA (Kubernetes and Cloud Native Associate, a beginner exam), CKA (Certified Kubernetes Administrator), CKAD (Certified Kubernetes Application Developer) and CKS (Certified Kubernetes Security Specialist). CKA, CKAD and CKS are hands-on exams in a real terminal, so labs like Part B are the best practice.
How long does it take to learn Kubernetes? You can understand the basics and build your first cluster in a weekend with this guide. Being comfortable at work usually takes a few months of regular practice. The fastest way is the one used here: read a little, then do it yourself.
✅ Part A done. You now know what each part of a cluster does. Time to build one.
Part B: Build your own Kubernetes cluster (hands-on lab)
From here on you build. Part B has 6 steps of its own: Part 1 (Google Cloud), Part 2 (install), Parts 3 to 5 (labs) and Part 6 (cleanup).
What you will build
At the end of this guide you will have 3 virtual machines (computers that run inside Google's data centre) working together as one Kubernetes cluster:
 Google Cloud · VPC "default" · zone us-east1-b
 ┌───────────────────────┐ ┌───────────────────────┐ ┌───────────────────────┐
 │ k8s-master │ │ k8s-worker1 │ │ k8s-worker2 │
 │ e2-medium 2 CPU 4 GB │ │ e2-medium 2 CPU 4 GB │ │ e2-medium 2 CPU 4 GB │
 │ control plane: │ │ kubelet │ │ kubelet │
 │ API server, etcd, │◄─►│ containerd │◄─►│ containerd │
 │ scheduler, kubectl │ │ calico-node │ │ calico-node │
 └───────────────────────┘ └───────────────────────┘ └───────────────────────┘
 ▲ pods talk across nodes through Calico IPIP tunnels (pod IPs 192.168.x.x)
 │
 your browser ──► http://<node-external-ip>:30080 (NodePort services)
Then you will use that cluster for 3 hands-on labs: Namespaces and Pods, Services, and ReplicaSets.
Quick recap: the words you need for the lab
You met these in Part A. Here they are in one place, so you can come back to this table while you build.
| Word | Plain meaning |
|---|---|
| Container | A small, packed box that holds one app and everything it needs to run (for example, the nginx web server). |
| Kubernetes | Software that runs containers for you across many machines, restarts them when they crash, and spreads the work. People often write it as K8s. |
| Cluster | A group of machines that Kubernetes manages as one big computer. |
| Node | One machine in the cluster. We have 3 nodes. |
| Master (control plane) | The "brain" node. It decides what runs where. It holds the API server (the front door you talk to), etcd (the cluster's memory) and the scheduler (the part that picks a node for each app). |
| Worker | A node that actually runs your apps. We have 2 workers. |
| containerd | The container runtime: the program on each node that downloads and starts containers. |
| kubeadm | The tool that builds the cluster: init on the master, join on the workers. |
| kubelet | A small agent on every node that starts and watches the containers Kubernetes asks for. |
| kubectl | The command you type to talk to the cluster ("kube-control"). |
| Calico | A network add-on that gives every pod an IP address and lets pods on different nodes talk to each other. |
| Pod | The smallest thing Kubernetes runs. A pod holds 1 or more containers that share the same IP address. |
Before you start: what you need and what it costs
| # | What | Why |
|---|---|---|
| 1 | A Google account (Gmail) | To sign in to Google Cloud |
| 2 | A Google Cloud account with billing enabled | Virtual machines are paid resources. New accounts usually get free trial credit. |
| 3 | A debit/credit card that allows online international payments | Google asks for it when you enable billing |
| 4 | A web browser (Chrome recommended) | Everything in this guide is done in the browser. Nothing to install on your laptop. |
How much will this cost?
| Item | Price (approx., us-east1) | For this lab |
|---|---|---|
| 3 × e2-medium VM | ~$0.034 per VM per hour | ~$0.10 / hour |
| 3 × 20 GB balanced disk | ~$0.10 per GB per month | ~$0.01 / hour |
| 3 × external IP address | ~$0.005 per IP per hour | ~$0.015 / hour |
| Total | ≈ $0.13 / hour ≈ $3 per day |
⚠️ Google charges while the machines exist, even when you are not using them. When you finish, follow Part 6 (Cleanup) at the end of this post. Prices change, so check the official Google Cloud pricing calculator at https://cloud.google.com/products/calculator before you start.
The values used everywhere in this guide
You will see these names again and again. Keep them exactly as they are, unless the table says you can change them.
| Parameter | Value used in this guide | Can I change it? |
|---|---|---|
| Project name | k8s-lab |
Yes, any name |
| Project ID | (Google creates it, e.g. coastal-pointer-514808-r3) |
Google picks it. Copy yours. |
| Region / Zone | us-east1 / us-east1-b |
Yes. Pick one near you, e.g. asia-south1-a (Mumbai). Use the same zone for all 3 VMs. |
| VM names | k8s-master, k8s-worker1, k8s-worker2 |
Yes, but then change the commands too |
| Machine type | e2-medium (2 vCPU, 4 GB RAM) |
Do not go smaller. Kubernetes needs at least 2 CPUs on the master. |
| Boot disk | 20 GB, pd-balanced |
20 GB or more |
| Operating system | Ubuntu 24.04 LTS (x86/64), image family ubuntu-2404-lts-amd64 |
Keep this. The guide is tested on it. |
| Network | default VPC |
Keep this |
| Network tag | k8s |
The firewall rules use this tag. Keep it. |
| Pod network (Calico) | 192.168.0.0/16 |
Keep this on Google Cloud |
A region is a city-level location of Google's data centres, and a zone is one building area inside that region. A VPC (Virtual Private Cloud) is your private network inside Google Cloud. A network tag is a label on a VM that firewall rules can point to.
How to read the commands in this guide
From Part 2 onwards you will have 3 terminal windows open, one for each machine. Every step tells you where to paste:
| Label | Paste in |
|---|---|
| 🟦 ALL 3 NODES | k8s-master, k8s-worker1 and k8s-worker2 (paste the same block in each window) |
| 🟩 MASTER ONLY | k8s-master window only |
| 🟧 WORKERS ONLY | k8s-worker1 and k8s-worker2 windows only |
How to paste: copy the whole grey box, click in the terminal, then right-click (or press Ctrl+Shift+V). The commands run. If nothing is asked and you get the prompt back, it worked.
A few things you will see in commands:
sudo= "run this as the administrator". Many setup commands need it.$at the end of a line on your screen (for exampleyourname@k8s-master:~$) is the prompt. It means "I am ready for the next command". You never type it.\at the end of a line means "this command continues on the next line". Copy all the lines together.- A line starting with
#inside a YAML file is a comment for humans. Kubernetes ignores it.
⚠️ Paste one box at a time and wait for it to finish (you get the
$prompt back) before you paste the next one.
Part 1: Set up Google Cloud (about 20 minutes)
Goal of this part: create 3 Ubuntu machines on Google Cloud (1 master + 2 workers) that are ready for Kubernetes.
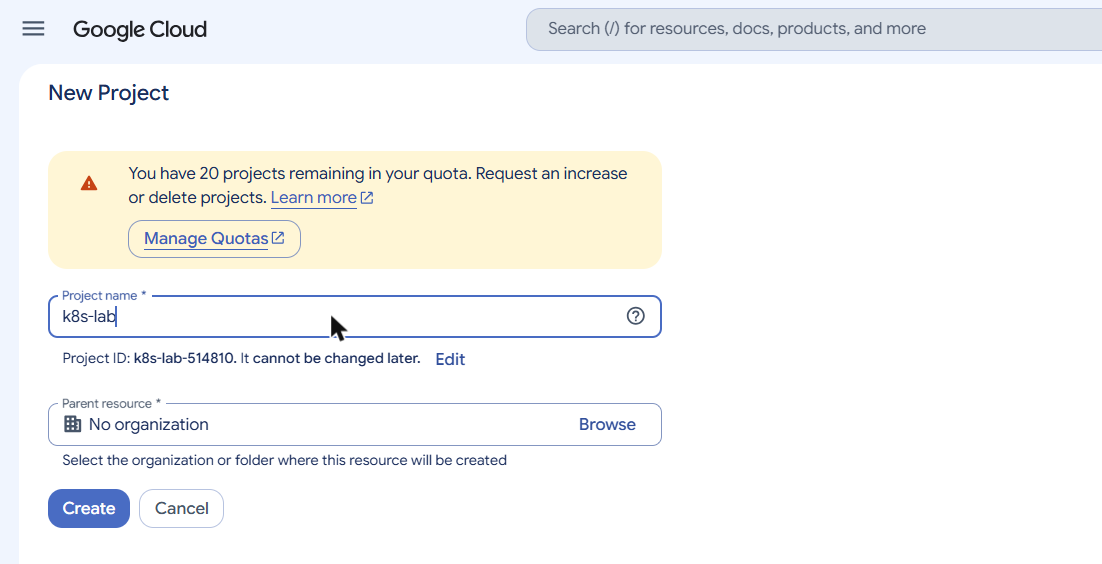
1.1 Create a project
A project is a folder in Google Cloud that holds everything for one piece of work, including the bill.
- Open https://console.cloud.google.com
- Click the project picker at the top of the page, then NEW PROJECT.
- Project name:
k8s-lab, then click CREATE. - Note the Project ID shown under the name. You need it in step 1.4.
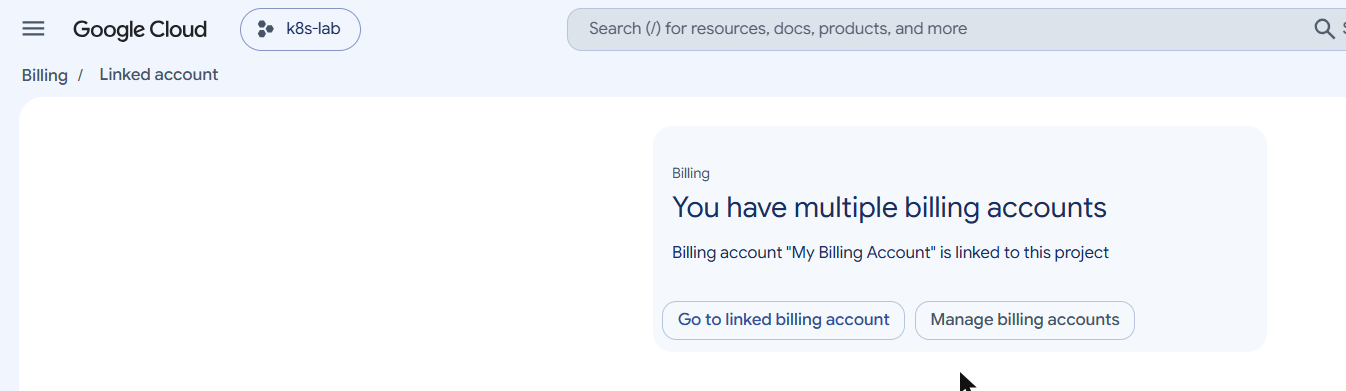
1.2 Turn on billing
- Open https://console.cloud.google.com/billing
- If you see "This billing account is closed", open the account, click Reopen billing account, then add a valid payment method.
- Link the billing account to your project: open https://console.cloud.google.com/billing/projects, find
k8s-lab, click ⋮, then Change billing, choose your open billing account and click SET ACCOUNT.
💡 Tip: set a budget alert so you get an email if costs go up: Billing → Budgets & alerts → CREATE BUDGET, amount
5USD.
1.3 Open Cloud Shell
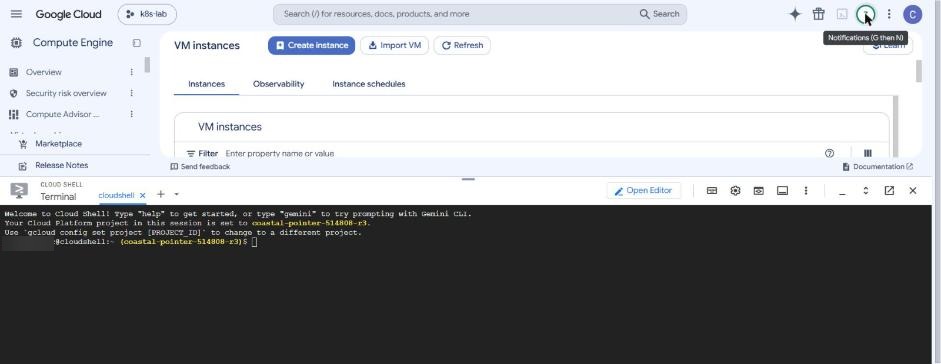
Cloud Shell is a free Linux terminal inside your browser. A terminal is a window where you type commands instead of clicking buttons. Google's command-line tool, gcloud, is already installed in it, so we use Cloud Shell for all Google Cloud commands.
- In the console, click the Activate Cloud Shell icon ( >_ ) at the top right.
- Wait until you see a prompt like
yourname@cloudshell:~$.
1.4 Point Cloud Shell to your project
Replace YOUR_PROJECT_ID with your own Project ID from step 1.1, then paste:
gcloud config set project YOUR_PROJECT_ID
gcloud config set compute/zone us-east1-b
gcloud config set compute/region us-east1
What this does: tells gcloud which project to work in, and which zone and region to use by default, so you do not have to type them in every command.
If Cloud Shell asks "Authorize Cloud Shell", click AUTHORIZE.
1.5 Turn on the Compute Engine API
Compute Engine is the Google Cloud service that runs virtual machines. An API is the "switch" that lets you use a service. It is off in a new project.
gcloud services enable compute.googleapis.comThis takes about 1 minute. The output ends with Operation "operations/..." finished successfully. If the API is already on, the command prints nothing. That is fine.
1.6 Create 2 firewall rules
A firewall decides which network traffic is allowed in. Google Cloud's default firewall already allows normal traffic between your VMs. Kubernetes needs 2 more rules:
| Rule | What it allows | Why |
|---|---|---|
k8s-allow-ipip |
IPIP protocol (protocol number 4) between VMs tagged k8s |
Calico sends pod-to-pod traffic between nodes inside IPIP "tunnels". Without this rule, pods on worker1 cannot talk to pods on worker2. |
k8s-allow-nodeport |
TCP ports 30000-32767 from the internet | So you can open your apps in your browser in Part 4 and Part 5 |
gcloud compute firewall-rules create k8s-allow-ipip \
 --network default --direction INGRESS --allow ipip \
 --source-tags k8s --target-tags k8s \
 --description "Calico IPIP between Kubernetes nodes"

gcloud compute firewall-rules create k8s-allow-nodeport \
 --network default --direction INGRESS --allow tcp:30000-32767 \
 --source-ranges 0.0.0.0/0 --target-tags k8s \
 --description "Kubernetes NodePort services for the lab"
What this does: INGRESS means "traffic coming in". --source-tags k8s --target-tags k8s means "from machines tagged k8s, to machines tagged k8s". --source-ranges 0.0.0.0/0 means "from anywhere on the internet".
Expected output (one table per rule):
NAME NETWORK DIRECTION PRIORITY ALLOW DENY DISABLED
k8s-allow-ipip default INGRESS 1000 ipip False

NAME NETWORK DIRECTION PRIORITY ALLOW DENY DISABLED
k8s-allow-nodeport default INGRESS 1000 tcp:30000-32767 False
🔒 Safety note:
0.0.0.0/0means anyone on the internet can reach ports 30000-32767. That is OK for a short lab with demo web pages. To allow only your own laptop, replace0.0.0.0/0withYOUR_PUBLIC_IP/32(find your IP by searching "what is my ip" in Google).🪤 Beginner trap: many older guides skip the IPIP rule. Everything installs fine, but pods on different workers silently cannot talk to each other. Do not skip it.
1.7 Create the 3 virtual machines
One command creates all 3 VMs:
gcloud compute instances create k8s-master k8s-worker1 k8s-worker2 \
 --zone us-east1-b \
 --machine-type e2-medium \
 --image-family ubuntu-2404-lts-amd64 \
 --image-project ubuntu-os-cloud \
 --boot-disk-size 20GB \
 --boot-disk-type pd-balanced \
 --tags k8s
What this does: creates 3 machines named k8s-master, k8s-worker1 and k8s-worker2, each with 2 CPUs and 4 GB RAM, Ubuntu 24.04, a 20 GB disk, and the network tag k8s (so the firewall rules from step 1.6 apply to them).
Expected output (your IP addresses will be different):
NAME ZONE MACHINE_TYPE PREEMPTIBLE INTERNAL_IP EXTERNAL_IP STATUS
k8s-master us-east1-b e2-medium 10.142.0.4 34.24.109.20 RUNNING
k8s-worker1 us-east1-b e2-medium 10.142.0.3 104.196.152.32 RUNNING
k8s-worker2 us-east1-b e2-medium 10.142.0.2 35.243.169.45 RUNNING
You may also see a warning: "Disk size: '20 GB' is larger than image size: '10 GB'...". Ignore it. Ubuntu grows the disk automatically.
Each VM has 2 addresses. The internal IP (like 10.142.0.4) is used between your VMs inside Google's network. The external IP (like 34.24.109.20) is the public address you use from your laptop's browser. 📝 Write both down for each VM. You can see them again any time with:
gcloud compute instances list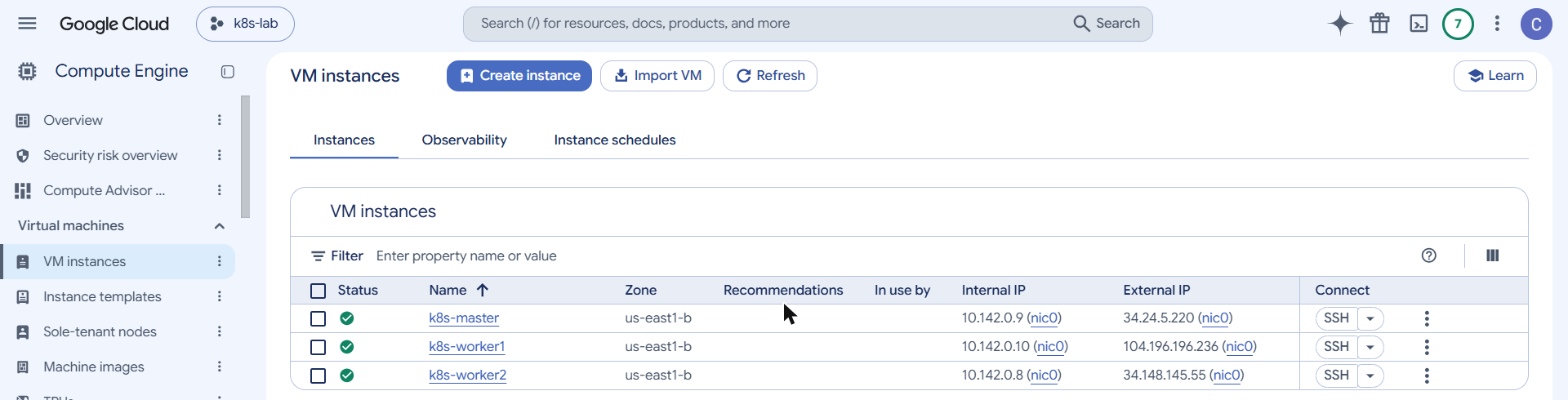
1.8 Connect to each VM (open 3 SSH windows)
SSH is a secure way to open a terminal on another computer. Google gives you a one-click SSH button, so you need no keys and no software.
- Open https://console.cloud.google.com/compute/instances
- Click SSH next to
k8s-master. A new browser window opens with a terminal. - Do the same for
k8s-worker1andk8s-worker2.
You now have 3 terminal windows. Keep them open for Part 2.

Alternative from Cloud Shell: gcloud compute ssh k8s-master (and the same for the workers).
Check that you are on the right machine before pasting anything:
hostnameIt prints k8s-master, k8s-worker1 or k8s-worker2 (sometimes with .us-east1-b.c.<project>.internal at the end, which is normal on Google Cloud).
✅ Part 1 done. You have 3 Ubuntu VMs and the firewall rules.
Part 2: Install Kubernetes with kubeadm (about 20 minutes)
Goal: turn the 3 Ubuntu VMs into a working Kubernetes cluster: 1 master + 2 workers. Steps 1 to 7 go on all 3 machines. Then the master creates the cluster and the workers join it.
🟦 Step 1: Stop the "restart services" pop-up (ALL 3 NODES)
Ubuntu 24.04 sometimes shows a purple "Which services should be restarted?" screen during installs. That screen blocks copy-paste. This turns it off:
sudo mkdir -p /etc/needrestart/conf.d
cat <<'EOF' | sudo tee /etc/needrestart/conf.d/99-k8s-lab.conf
$nrconf{restart} = 'a';
$nrconf{kernelhints} = -1;
EOF
What this does: mkdir -p creates a folder. cat <<'EOF' ... EOF writes the lines between the two EOF markers into a file, and sudo tee saves that file as administrator. The 2 lines tell Ubuntu to restart services automatically instead of asking you.
If you ever still see the purple screen: press Tab until <Ok> is highlighted, then press Enter.
🟦 Step 2: Turn off swap (ALL 3 NODES)
Swap is disk space that Linux uses as extra memory when RAM is full. Kubernetes wants it turned off, so it can plan memory exactly.
sudo swapoff -a
sudo sed -i '/ swap / s/^\(.*\)$/#\1/g' /etc/fstab
What this does: swapoff -a turns swap off now. The sed line puts a # in front of any swap line in /etc/fstab (the file that lists disks to use at start-up), so swap stays off after a reboot. No output means success. (Google Cloud VMs have no swap anyway; this is for other environments.)
🟦 Step 3: Load 2 kernel modules (ALL 3 NODES)
The kernel is the core of Linux. Modules are add-ons for it. Containers need overlay (for container file systems) and br_netfilter (so the firewall can see container traffic).
cat <<EOF | sudo tee /etc/modules-load.d/k8s.conf
overlay
br_netfilter
EOF
sudo modprobe overlay
sudo modprobe br_netfilter
What this does: the file makes Linux load both modules at every start-up, and modprobe loads them right now. Expected output:
overlay
br_netfilter
🟦 Step 4: Network settings (ALL 3 NODES)
These settings let Linux forward traffic between pods. They stay after a reboot.
cat <<EOF | sudo tee /etc/sysctl.d/k8s.conf
net.bridge.bridge-nf-call-iptables = 1
net.bridge.bridge-nf-call-ip6tables = 1
net.ipv4.ip_forward = 1
EOF
sudo sysctl --system
What this does: ip_forward = 1 lets the machine pass network packets from one place to another (like a router). The 2 bridge lines make container traffic go through the Linux firewall rules (iptables) that Kubernetes uses. sysctl --system applies the settings now.
Expected: a long list ending with the 3 lines you just added:
* Applying /etc/sysctl.d/k8s.conf ...
net.bridge.bridge-nf-call-iptables = 1
net.bridge.bridge-nf-call-ip6tables = 1
net.ipv4.ip_forward = 1
🟦 Step 5: Install containerd, the container runtime (ALL 3 NODES)
Kubernetes does not need Docker. It only needs containerd, which runs the containers. We install it from Docker's official package repository because it has the newest version.
sudo apt-get update
sudo apt-get install -y ca-certificates curl gpg
sudo install -m 0755 -d /etc/apt/keyrings
sudo curl -fsSL https://download.docker.com/linux/ubuntu/gpg -o /etc/apt/keyrings/docker.asc
sudo chmod a+r /etc/apt/keyrings/docker.asc
echo "deb [arch=$(dpkg --print-architecture) signed-by=/etc/apt/keyrings/docker.asc] https://download.docker.com/linux/ubuntu $(. /etc/os-release && echo "$VERSION_CODENAME") stable" | sudo tee /etc/apt/sources.list.d/docker.list
sudo apt-get update
sudo apt-get install -y containerd.io
What this does: apt-get is Ubuntu's app store on the command line. update refreshes the list of available software. The curl line downloads Docker's signing key (so Ubuntu can check the downloads are genuine), the echo line adds Docker's software source, and the last line installs only the containerd.io package.
This takes 1-2 minutes and prints a lot of text. It is done when you get the $ prompt back.
🟦 Step 6: Configure containerd (ALL 3 NODES)
Kubernetes and containerd must use the same cgroup driver (systemd). A cgroup is how Linux limits how much CPU and memory a program may use; both sides must manage it the same way. This creates the config file and switches it on:
sudo mkdir -p /etc/containerd
containerd config default | sudo tee /etc/containerd/config.toml > /dev/null
sudo sed -i 's/SystemdCgroup = false/SystemdCgroup = true/' /etc/containerd/config.toml
sudo systemctl restart containerd
sudo systemctl enable containerd
What this does: writes containerd's default settings to a file, changes SystemdCgroup = false to true with sed (a find-and-replace tool), restarts containerd, and enable makes it start automatically after a reboot. (Even containerd 2.x still ships with false in its default config, so this sed is still needed.)
Check it (paste this too):
grep SystemdCgroup /etc/containerd/config.toml
systemctl is-active containerd
containerd --version
Expected output:
 SystemdCgroup = true
active
containerd containerd v2.4.2 ...
If you see SystemdCgroup = false, run the sed line from Step 6 again, then sudo systemctl restart containerd.
🟦 Step 7: Install kubeadm, kubelet and kubectl (ALL 3 NODES)
| Tool | What it does |
|---|---|
kubeadm |
Builds the cluster (init on master, join on workers) |
kubelet |
The agent that runs on every node and starts pods |
kubectl |
The command you type to talk to the cluster |
sudo mkdir -p -m 755 /etc/apt/keyrings
curl -fsSL https://pkgs.k8s.io/core:/stable:/v1.37/deb/Release.key | sudo gpg --dearmor --yes -o /etc/apt/keyrings/kubernetes-apt-keyring.gpg
echo 'deb [signed-by=/etc/apt/keyrings/kubernetes-apt-keyring.gpg] https://pkgs.k8s.io/core:/stable:/v1.37/deb/ /' | sudo tee /etc/apt/sources.list.d/kubernetes.list
sudo apt-get update
sudo apt-get install -y kubelet kubeadm kubectl
sudo apt-mark hold kubelet kubeadm kubectl
sudo systemctl enable --now kubelet
What this does: adds the official Kubernetes v1.37 software source (with its signing key), installs the 3 tools, and starts kubelet. apt-mark hold stops Ubuntu from upgrading Kubernetes by accident. Kubernetes upgrades must be done on purpose, one version at a time.
Check it:
kubeadm version -o short
kubectl version --client
Expected output:
v1.37.2
Client Version: v1.37.2
Kustomize Version: v5.8.1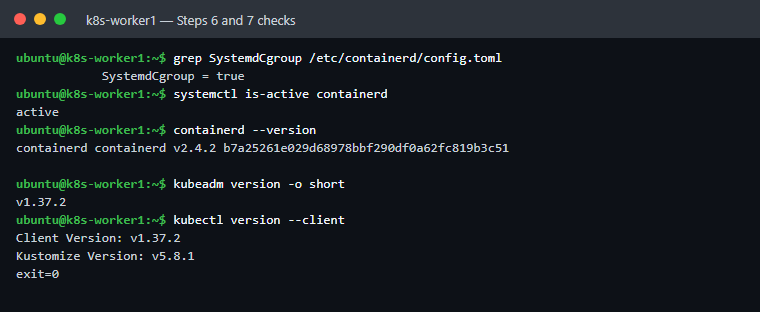
ℹ️ Do not panic:
systemctl status kubeletwill show kubelet restarting every few seconds right now. That is normal. It waits forkubeadm init/kubeadm joinin the next steps.
✅ Checkpoint: Steps 1-7 must be done on all 3 nodes before you continue.
🟩 Step 8: Create the cluster (MASTER ONLY)
sudo kubeadm init --apiserver-advertise-address=$(hostname -I | awk '{print $1}') --pod-network-cidr=192.168.0.0/16What the 2 options mean:
--apiserver-advertise-address= the master's internal IP (here10.142.0.4).hostname -I | awk '{print $1}'finds it for you.--pod-network-cidr=192.168.0.0/16= the range of IP addresses Calico gives to pods. A CIDR like/16is a short way to write a range of addresses (here, every address from192.168.0.0to192.168.255.255).
This takes 1-3 minutes. At the end you must see:
Your Kubernetes control-plane has initialized successfully!
...
Then you can join any number of worker nodes by running the following on each as root:

kubeadm join 10.142.0.4:6443 --token lpendf.v4dmrnbq6zlc82zg \
 --discovery-token-ca-cert-hash sha256:244fc8a2...d0d548a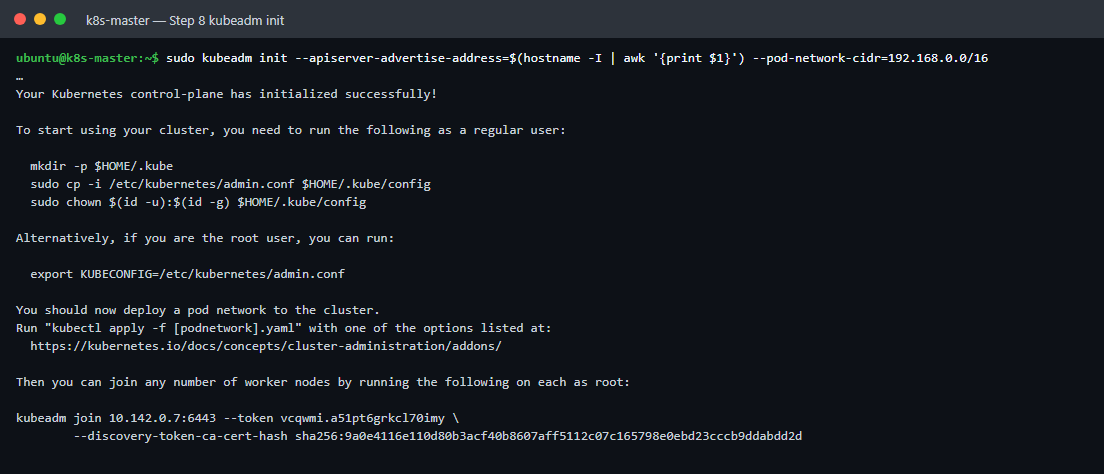
📝 Copy the kubeadm join ... lines into Notepad. You need them in Step 12. (Lost them? Step 11 shows how to print them again.)
🪤 Beginner trap: older guides use
$(hostname -i)(small i). On Ubuntu that often returns127.0.1.1, an address only the master itself can reach, so the workers cannot join. Usehostname -I(capital I) exactly as shown.
🟩 Step 9: Let your user run kubectl (MASTER ONLY)
kubeadm init created an admin "key file" called admin.conf. kubectl looks for it in your home folder at ~/.kube/config. These lines copy it there and make you its owner:
mkdir -p $HOME/.kube
sudo cp -i /etc/kubernetes/admin.conf $HOME/.kube/config
sudo chown $(id -u):$(id -g) $HOME/.kube/config
Test it:
kubectl get nodesNAME STATUS ROLES AGE VERSION
k8s-master.us-east1-b.c.coastal-pointer-514808-r3.internal NotReady control-plane 45s v1.37.2NotReady is expected: there is no pod network yet. We fix that in Step 10. On Google Cloud, node names are long (k8s-master.us-east1-b.c.<project-id>.internal). That is normal.
🟩 Step 10: Install the Calico pod network (MASTER ONLY)
kubectl apply -f https://raw.githubusercontent.com/projectcalico/calico/v3.33.0/manifests/calico.yamlWhat this does: kubectl apply -f gives Kubernetes a file that describes what you want, here the full Calico network add-on (version v3.33.0). You see many ... created lines.
Now wait until the master becomes Ready (about 1-2 minutes). -w means "watch": the list updates by itself.
kubectl get nodes -wWhen STATUS shows Ready, press Ctrl + C to stop watching. Then check the system pods. -n kube-system means "in the namespace called kube-system", where Kubernetes keeps its own parts:
kubectl get pods -n kube-systemAll pods should be Running:
NAME READY STATUS RESTARTS AGE
calico-kube-controllers-846669895c-kkfck 1/1 Running 0 2m
calico-node-v9xjv 1/1 Running 0 2m
coredns-559f6c778d-c2pln 1/1 Running 0 2m
coredns-559f6c778d-j5tc9 1/1 Running 0 2m
etcd-k8s-master... 1/1 Running 0 2m
kube-apiserver-k8s-master... 1/1 Running 0 2m
kube-controller-manager-k8s-master... 1/1 Running 0 2m
kube-proxy-cxpsc 1/1 Running 0 2m
kube-scheduler-k8s-master... 1/1 Running 0 2m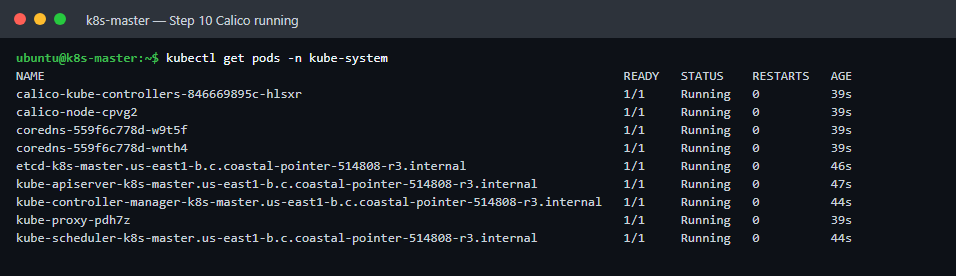
You can now see the parts from the diagram: etcd, kube-apiserver and kube-scheduler. coredns is the cluster's phone book (it turns service names into IP addresses), and kube-proxy forwards traffic to the right pods.
🟩 Step 11: Print the join command (MASTER ONLY)
If you saved the join command from Step 8 you can skip this. Otherwise (or if more than 24 hours passed, because tokens expire), print a fresh one:
sudo kubeadm token create --print-join-commandkubeadm join 10.142.0.4:6443 --token u1vwnt.dexyugnafpkkunr0 --discovery-token-ca-cert-hash sha256:244fc8a22c8bace870c908479e1c4f0ea42df5434b5ad6c5b6a5664d3d0d548aThe token is a temporary password, and the hash lets the worker check it is talking to the real master. Port 6443 is the API server's door.
🟧 Step 12: Join the workers (WORKERS ONLY)
In k8s-worker1 and k8s-worker2: type sudo and then paste your own join command from Step 8 or Step 11. It looks like this (⚠️ do not copy this example: your IP, token and hash are different):
sudo kubeadm join 10.142.0.4:6443 --token u1vwnt.dexyugnafpkkunr0 --discovery-token-ca-cert-hash sha256:244fc8a22c8bace870c908479e1c4f0ea42df5434b5ad6c5b6a5664d3d0d548aExpected at the end:
This node has joined the cluster:
* Certificate signing request was sent to apiserver and a response was received.
* The Kubelet was informed of the new secure connection details.

Run 'kubectl get nodes' on the control-plane to see this node join the cluster.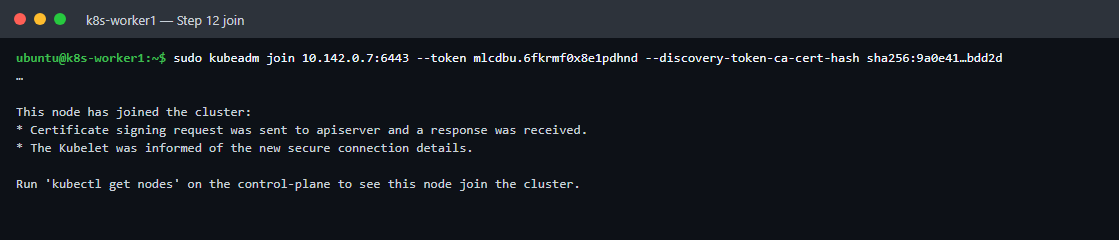
🟩 Step 13: Check the cluster (MASTER ONLY)
watch -n 2 kubectl get nodeswatch -n 2 re-runs the command every 2 seconds. Wait until all 3 nodes show Ready (1-2 minutes), then press Ctrl + C. Now see more detail with -o wide ("output wide", which adds extra columns):
kubectl get nodes -o wideNAME STATUS ROLES AGE VERSION INTERNAL-IP OS-IMAGE CONTAINER-RUNTIME
k8s-master.us-east1... Ready control-plane 6m42s v1.37.2 10.142.0.4 Ubuntu 24.04.5 LTS containerd://2.4.2
k8s-worker1.us-east1... Ready <none> 56s v1.37.2 10.142.0.3 Ubuntu 24.04.5 LTS containerd://2.4.2
k8s-worker2.us-east1... Ready <none> 56s v1.37.2 10.142.0.2 Ubuntu 24.04.5 LTS containerd://2.4.2Optional: show "worker" in the ROLES column. This loop adds a label to each node whose name contains "worker":
for n in $(kubectl get nodes -o name | grep worker); do kubectl label $n node-role.kubernetes.io/worker=worker; done
kubectl get nodes
NAME STATUS ROLES AGE VERSION
k8s-master.us-east1... Ready control-plane 8m v1.37.2
k8s-worker1.us-east1... Ready worker 2m v1.37.2
k8s-worker2.us-east1... Ready worker 2m v1.37.2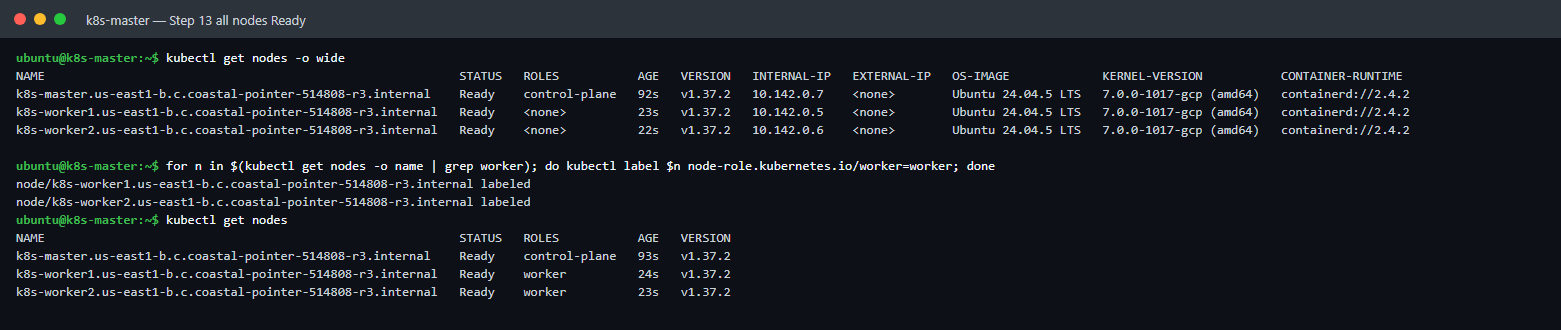
🟩 Step 14: Smoke test, run a real app (MASTER ONLY)
A smoke test is a quick "does it work at all?" check. This starts 2 copies of the nginx web server and opens them to your browser:
kubectl create deployment hello --image=nginx:1.29 --replicas=2
kubectl expose deployment hello --type=NodePort --port=80
kubectl rollout status deployment hello
kubectl get pods -o wide
kubectl get svc hello
NAME TYPE CLUSTER-IP EXTERNAL-IP PORT(S) AGE
hello NodePort 10.97.41.120 <none> 80:31234/TCP 10sOpen http://<EXTERNAL_IP of any VM>:<NodePort> in your browser (example: http://104.196.152.32:31234; use your own IP and the number after 80:). You should see "Welcome to nginx!".
Clean up the test app:
kubectl delete svc hello
kubectl delete deployment hello
🎉 Your Kubernetes cluster is ready!
Part 3: Lab: Namespaces and Pods (about 30 minutes)
Where: 🟩 run everything in this part on k8s-master only. You need: kubectl get nodes shows 3 × Ready.
| Word | Plain meaning |
|---|---|
| Pod | The smallest thing Kubernetes runs. A pod holds 1 or more containers that share the same IP address. |
| Namespace | A folder for Kubernetes objects. It keeps teams or apps apart (in this lab, twitter and facebook are just example folder names). |
| Label | A sticker on an object, like app=nginx. You use labels to find and group objects. |
| YAML file | A text file that describes what you want. You give it to Kubernetes with kubectl apply -f file.yaml. Indentation (spaces) matters in YAML. |
Make a folder for your lab files and move into it (cd = change directory):
mkdir -p ~/k8s-labs/1-namespace-pod
cd ~/k8s-labs/1-namespace-pod
💡 In every lab, you first create the YAML file with
cat <<'EOF' > name.yaml ... EOF(just copy the whole box), then apply it.
Lab 3.1: Look at the namespaces you already have
kubectl get nsNAME STATUS AGE
default Active 8m30s
kube-node-lease Active 8m30s
kube-public Active 8m30s
kube-system Active 8m30s| Namespace | What is inside |
|---|---|
default |
Where your objects go if you do not say a namespace |
kube-system |
Kubernetes' own pods (API server, etcd, DNS, Calico…). Never delete it. |
kube-public, kube-node-lease |
Used by Kubernetes itself. Leave them alone. |
See what is running inside kube-system, and on which node:
kubectl get pods -n kube-system -o wide-n = which namespace. -o wide = show more columns (IP and NODE).
Lab 3.2: Create a namespace with one command
kubectl create ns azure
kubectl get ns
namespace/azure created
NAME STATUS AGE
azure Active 0s
default Active 8m30s
...Lab 3.3: Create namespaces from a YAML file
cat <<'EOF' > namespace.yaml
apiVersion: v1
kind: Namespace
metadata:
 name: twitter
---
apiVersion: v1
kind: Namespace
metadata:
 name: facebook
EOF
kubectl apply -f namespace.yaml
kubectl get ns
Reading the YAML: kind says what type of object this is, metadata.name is its name, and apiVersion tells Kubernetes which version of the rules to use. --- separates 2 objects inside one file.
namespace/twitter created
namespace/facebook created
NAME STATUS AGE
azure Active 1s
default Active 8m31s
facebook Active 1s
...
twitter Active 1s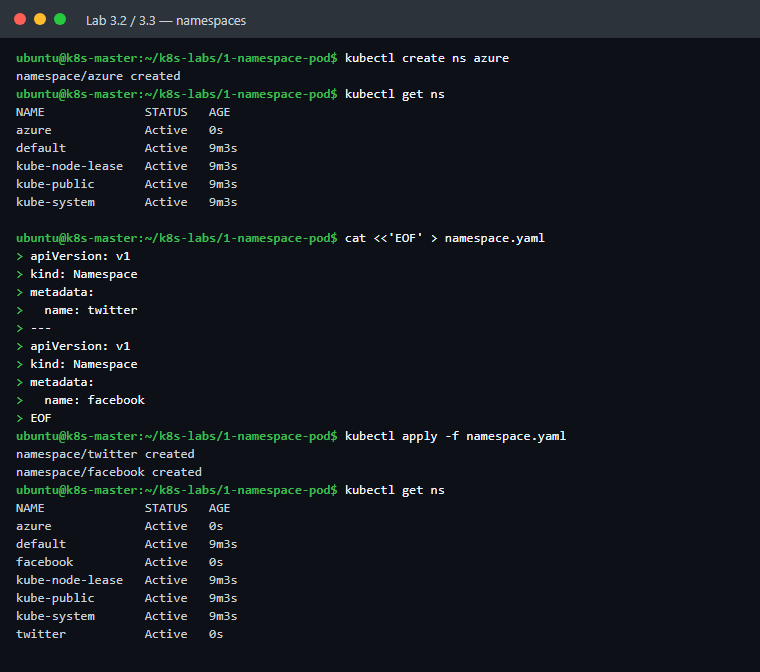
Lab 3.4: Your first pod (nginx web server)
cat <<'EOF' > 1-singlepod.yaml
apiVersion: v1
kind: Pod
metadata:
 name: webserver
 namespace: twitter
 labels:
 app: nginx
 tier: front
 version: v1
 env: production
spec:
 containers:
 - name: nginx
 image: nginx:1.29
 ports:
 - containerPort: 80
EOF
kubectl apply -f 1-singlepod.yaml
Reading the YAML: a pod named webserver in the twitter namespace, with 4 labels. Under spec (the "specification", what should run), it has one container from the image nginx:1.29. An image is the packed app that a container is started from; 1.29 is its version. containerPort: 80 is the port nginx listens on.
Watch it start (ContainerCreating → Running), then press Ctrl + C:
kubectl get pods -n twitter -wkubectl get all -n twitterNAME READY STATUS RESTARTS AGE
pod/webserver 1/1 Running 0 9s1/1 means 1 container of 1 is ready.
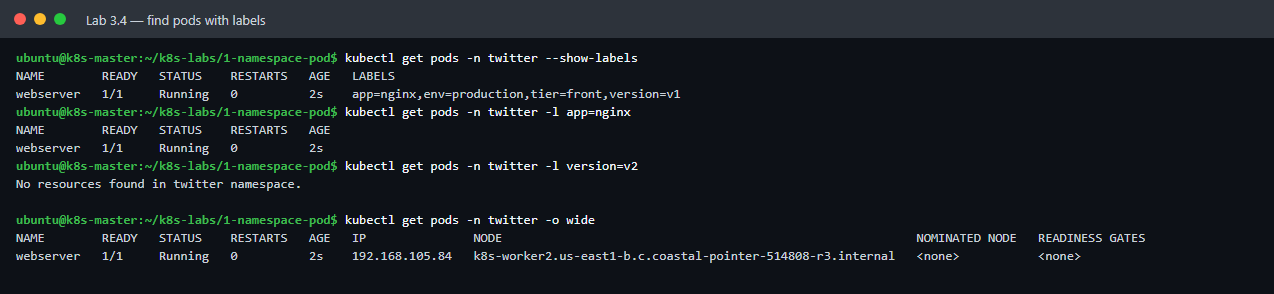
Find pods with labels
kubectl get pods -n twitter --show-labels
kubectl get pods -n twitter -l app=nginx
kubectl get pods -n twitter -l version=v2
NAME READY STATUS RESTARTS AGE LABELS
webserver 1/1 Running 0 10s app=nginx,env=production,tier=front,version=v1
NAME READY STATUS RESTARTS AGE
webserver 1/1 Running 0 10s
No resources found in twitter namespace.-l means "only show objects with this label". The last command finds nothing because our pod is version=v1, not v2. Labels are how Kubernetes finds things. You will use this a lot with Services and ReplicaSets.
Which node is it on? What is its IP?
kubectl get pods -n twitter -o wideNAME READY STATUS RESTARTS AGE IP NODE
webserver 1/1 Running 0 10s 192.168.105.65 k8s-worker2.us-east1-b.c....internalThe scheduler put the pod on a worker, and Calico gave it an IP from 192.168.0.0/16.
All the details and events
kubectl describe pod webserver -n twitterScroll to Events at the bottom. It tells the pod's story, step by step:
Events:
 Type Reason Age From Message
 ---- ------ ---- ---- -------
 Normal Scheduled 10s default-scheduler Successfully assigned twitter/webserver to k8s-worker2...
 Normal Pulling 6s kubelet Pulling image "nginx:1.29"
 Normal Pulled 1s kubelet Successfully pulled image "nginx:1.29" in 5.545s
 Normal Created 1s kubelet Container created
 Normal Started 1s kubelet Container started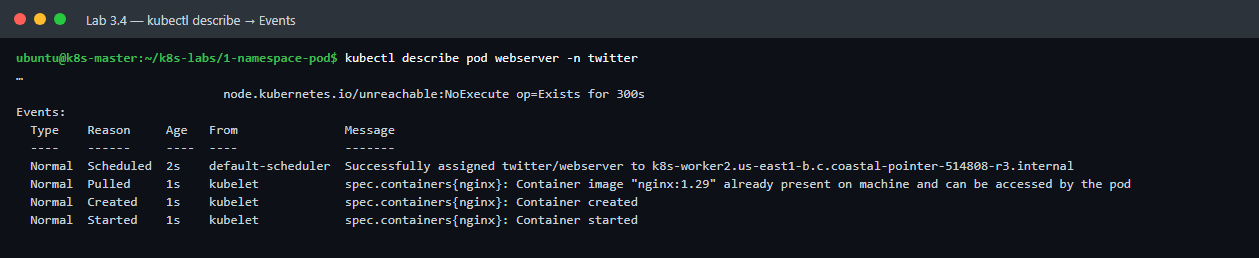
💡 When a pod does not start,
kubectl describe→ Events is the first place to look.
Go inside the container
kubectl exec -it webserver -n twitter -- bashexec runs a command inside a container. -it makes it interactive (you can type), and bash is the shell you open. The -- separates kubectl's options from the command you run inside the container. You are now inside the nginx container. Try:
hostname
nginx -v
cat /etc/os-release
exit
exit takes you back to the master. You can also run a single command without going inside:
kubectl exec webserver -n twitter -- nginx -vnginx version: nginx/1.29.8Read the container's logs and delete the pod
Logs are the messages an app prints while it runs.
kubectl logs webserver -n twitterkubectl delete -f 1-singlepod.yamlpod "webserver" deleted from twitter namespaceLab 3.5: One pod, two containers (web + database)
cat <<'EOF' > 2-multicontainer-pod.yaml
# One pod with two containers: a web server and a database
apiVersion: v1
kind: Pod
metadata:
 name: multicontainer-pod
 namespace: facebook
 labels:
 app: httpd
 tier: frontend-backend
 version: v1
spec:
 containers:
 - name: web
 image: httpd:2.4
 ports:
 - containerPort: 80
 - name: db
 image: mysql:8.4
 ports:
 - containerPort: 3306
 env:
 - name: MYSQL_ROOT_PASSWORD
 value: LabPassword123
EOF
kubectl apply -f 2-multicontainer-pod.yaml
Reading the YAML: this pod has 2 containers: web (the Apache web server, httpd) and db (MySQL). env sets an environment variable, a setting passed to the app when it starts; here, the database password (fine for a lab, never do this in real projects).
MySQL is a big image, so wait about 30-60 seconds, then:
kubectl get pods -n facebookNAME READY STATUS RESTARTS AGE
multicontainer-pod 2/2 Running 0 26s2/2 = 2 containers, both ready. With 2 containers you must say which one with -c:
kubectl exec multicontainer-pod -n facebook -c web -- httpd -v
kubectl exec multicontainer-pod -n facebook -c db -- mysql --version
Server version: Apache/2.4.71 (Unix)
Server built: Nov 11 2026 22:59:24
mysql Ver 8.4.13 for Linux on x86_64 (MySQL Community Server - GPL)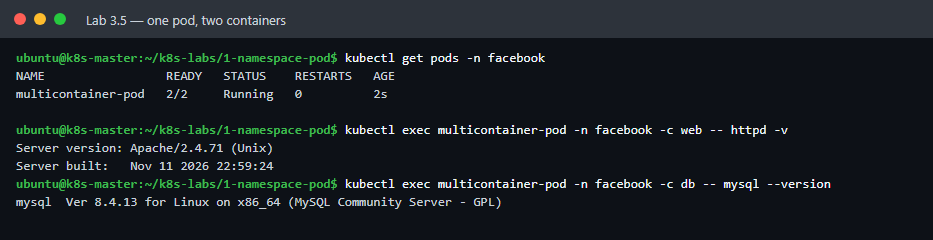
🪤 Beginner trap:
error: unable to upgrade connection: container not found ("db")means MySQL is still starting. Wait untilkubectl get pods -n facebookshows2/2, then try again.
Go inside each container (type exit to come back):
kubectl exec -it multicontainer-pod -n facebook -c web -- bash
kubectl exec -it multicontainer-pod -n facebook -c db -- bash
If you forget -c, kubectl picks the first container and says: Defaulted container "web" out of: web, db. Delete the pod:
kubectl delete -f 2-multicontainer-pod.yamlLab 3.6: Break it on purpose, two containers on the same port
Containers in one pod share one network. Two containers cannot both use port 80. Let's see what that error looks like, because learning to read errors is half of the job.
cat <<'EOF' > 3-duplicate-port-pod.yaml
# Two containers in one pod both want port 80. Only ONE can win.
# This file is MEANT to fail - it teaches you how to find errors.
apiVersion: v1
kind: Pod
metadata:
 name: duplicate-port-pod
 namespace: facebook
 labels:
 app: duplicate-demo
spec:
 containers:
 - name: httpd1
 image: httpd:2.4
 ports:
 - containerPort: 80
 - name: httpd2
 image: httpd:2.4
 ports:
 - containerPort: 80
EOF
kubectl apply -f 3-duplicate-port-pod.yaml
Kubernetes already warns you:
Warning: spec.containers[1].ports[0]: duplicate port definition with spec.containers[0].ports[0]
pod/duplicate-port-pod created
Wait about 1 minute, then:
kubectl get pods -n facebookNAME READY STATUS RESTARTS AGE
duplicate-port-pod 1/2 CrashLoopBackOff 3 (44s ago) 60sSTATUS can also show Error; it switches between the two. CrashLoopBackOff means "this container keeps crashing, so Kubernetes waits a little longer before each restart". 1/2 = only one container works. Find out why (tail -2 shows only the last 2 lines):
kubectl logs duplicate-port-pod -n facebook -c httpd1 | tail -2
kubectl logs duplicate-port-pod -n facebook -c httpd2 | tail -4
... AH00489: Apache/2.4.71 (Unix) configured -- resuming normal operations
... AH00094: Command line: 'httpd -D FOREGROUND'
(98)Address already in use: AH00072: make_sock: could not bind to address [::]:80
(98)Address already in use: AH00072: make_sock: could not bind to address 0.0.0.0:80
no listening sockets available, shutting down
AH00015: Unable to open logs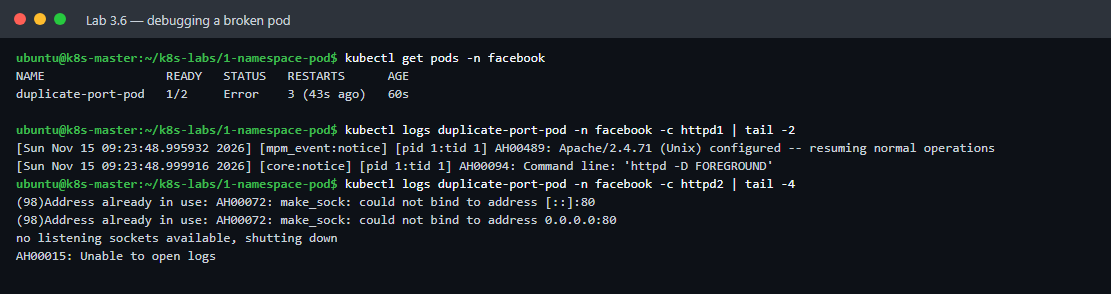
httpd1 got port 80 first. httpd2 says "Address already in use". You can also see the restarts in kubectl describe pod duplicate-port-pod -n facebook.
🧠 Debugging recipe to remember:
kubectl get pods(what is wrong?) →kubectl describe pod(Events) →kubectl logs(the app's own error).
kubectl delete -f 3-duplicate-port-pod.yamlLab 3.7: A database pod that saves data on the node (hostPath)
Normally, when a container is deleted, its files are gone. A volume is storage you attach to a pod so data can live outside the container. hostPath is the simplest kind: a folder on the node's own disk.
cat <<'EOF' > 4-storage-pod.yaml
# A database pod that saves its data on the worker node disk (hostPath)
apiVersion: v1
kind: Pod
metadata:
 name: database
 namespace: twitter
 labels:
 app: postgres
 tier: backend
spec:
 containers:
 - name: postgres
 image: postgres:17
 env:
 - name: POSTGRES_PASSWORD
 value: LabPassword123
 ports:
 - containerPort: 5432
 volumeMounts:
 - name: pgdata
 mountPath: /var/lib/postgresql/data
 volumes:
 - name: pgdata
 hostPath:
 path: /var/lib/k8s-lab/postgres
 type: DirectoryOrCreate
EOF
kubectl apply -f 4-storage-pod.yaml
Reading the YAML: volumes defines the storage (/var/lib/k8s-lab/postgres on the node, created if missing), and volumeMounts plugs it into the container at the folder where PostgreSQL keeps its data.
Wait about 30 seconds. PostgreSQL needs a few seconds after the pod is Running to prepare the database. Check the log until you see ready to accept connections:
kubectl logs database -n twitter | tail -2... LOG: database system was shut down at 2026-11-15 08:57:48 UTC
... LOG: database system is ready to accept connectionsCreate a database and list it (psql is PostgreSQL's command-line tool):
kubectl exec database -n twitter -- psql -U postgres -c "CREATE DATABASE labdb;"
kubectl exec database -n twitter -- psql -U postgres -c "\l" | grep labdb
CREATE DATABASE
labdb | postgres | UTF8 | libc | en_US.utf8 | en_US.utf8 | | |🪤 Beginner trap:
psql: error: connection to server on socket ... failedmeans PostgreSQL is not ready yet. Wait 10 seconds and try again.💡 Doing this lab a second time and you see
ERROR: database "labdb" already exists? That is the hostPath at work: the data from your first run is still on the worker's disk, so the new pod found it. 🎉

Where is the data? On the worker's own disk. Find the node:
kubectl get pod database -n twitter -o wideThen, in that worker's SSH window (for example k8s-worker2):
sudo ls /var/lib/k8s-lab/postgresPG_VERSION base global pg_commit_ts pg_dynshmem pg_hba.conf ...⚠️
hostPathdata lives on one node. If the pod is recreated on the other worker, it will not see this data. Real apps use PersistentVolumes (a later topic).
kubectl delete -f 4-storage-pod.yamlLab 3.8: A YAML file without a namespace
This file has no namespace: line. You choose the namespace with -n when you apply it:
cat <<'EOF' > 5-pod-no-namespace.yaml
# No namespace inside this file. You choose it with -n when you apply it.
apiVersion: v1
kind: Pod
metadata:
 name: first-pod
 labels:
 app: demo
spec:
 containers:
 - name: web-server
 image: httpd:2.4
 ports:
 - containerPort: 80
 - name: redis
 image: redis:8
 ports:
 - containerPort: 6379
EOF
kubectl apply -f 5-pod-no-namespace.yaml -n facebook
kubectl get pods -n facebook
kubectl get pods -n defaultNAME READY STATUS RESTARTS AGE
first-pod 2/2 Running 0 3s
No resources found in default namespace.❓ Try it yourself: what happens if you run
kubectl apply -f 5-pod-no-namespace.yamlwithout-n? (Answer: it goes intodefault.)
kubectl delete -f 5-pod-no-namespace.yaml -n facebookLab 3.9: Delete a namespace
⚠️ Deleting a namespace deletes everything inside it.
kubectl delete ns azure
kubectl get ns
Keep twitter and facebook: the next labs use them.
✅ Part 3 done.
Part 4: Lab: Services (about 30 minutes)
Where: 🟩 run everything on k8s-master, plus your laptop's browser.
Why do we need a Service?
Pods come and go, and every new pod gets a new IP address. A Service gives your pods one fixed name and IP, and sends traffic to the right pods using labels. The Service's selector is the label it looks for.
 Service "web-service" (selector: role=web-service)
 │
 ┌───────────────┼───────────────┐
 ▼ ▼ ▼
pod (role=web-service) pod (role=web-service) pod (other label → NOT used)| Service type | Who can reach it | Used for |
|---|---|---|
| ClusterIP (default) | Only pods inside the cluster | Database, internal APIs |
| NodePort | Anyone who can reach a node's IP on a port 30000-32767 | Labs, simple testing |
| LoadBalancer | The internet, through a cloud load balancer | Production on GKE / EKS / AKS |
If you skipped Part 3, these lines create the namespaces safely (they do nothing if the namespaces already exist), then make a new lab folder:
kubectl create ns twitter --dry-run=client -o yaml | kubectl apply -f -
kubectl create ns facebook --dry-run=client -o yaml | kubectl apply -f -
mkdir -p ~/k8s-labs/2-service
cd ~/k8s-labs/2-service
Lab 4.1: ClusterIP, reach a pod from inside the cluster
cat <<'EOF' > 1-clusterip-service.yaml
# A pod + a ClusterIP service (reachable only INSIDE the cluster)
apiVersion: v1
kind: Pod
metadata:
 name: webserver
 namespace: facebook
 labels:
 role: web-service
spec:
 containers:
 - name: nginx
 image: nginx:1.29
 ports:
 - containerPort: 80
---
apiVersion: v1
kind: Service
metadata:
 name: web-service
 namespace: facebook
spec:
 type: ClusterIP
 selector:
 role: web-service
 ports:
 - port: 80
 targetPort: 80
EOF
kubectl apply -f 1-clusterip-service.yaml
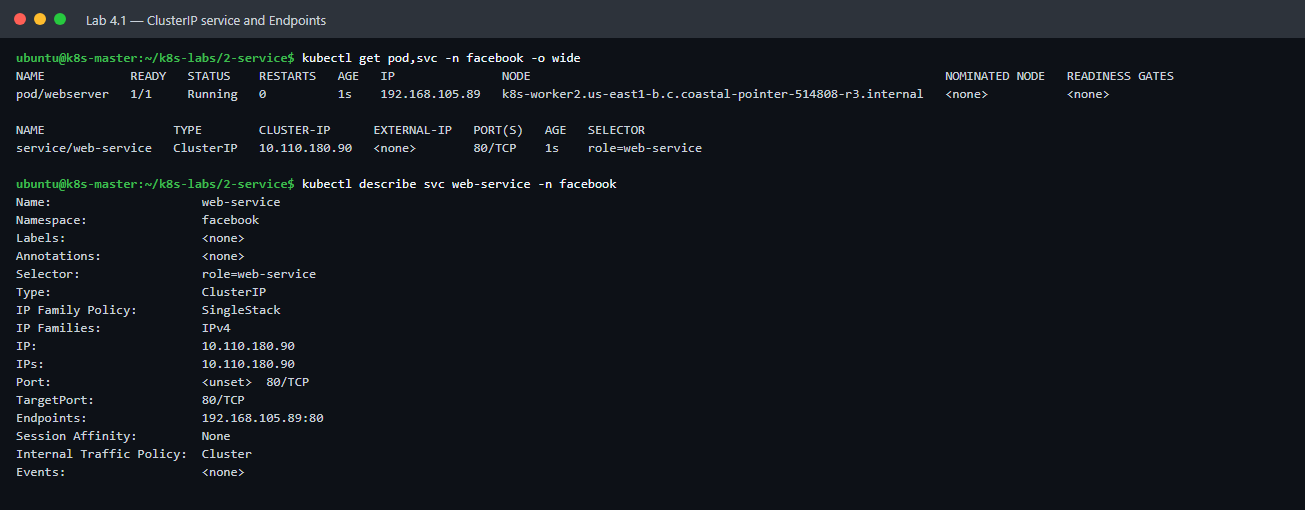
Reading the YAML: the pod has the label role: web-service. The Service's selector asks for that same label. port is the Service's own port, and targetPort is the port on the pod it forwards to.
kubectl get pod,svc -n facebook -o wideNAME READY STATUS RESTARTS AGE IP NODE
pod/webserver 1/1 Running 0 6s 192.168.19.69 k8s-worker1...
NAME TYPE CLUSTER-IP EXTERNAL-IP PORT(S) AGE SELECTOR
service/web-service ClusterIP 10.110.135.144 <none> 80/TCP 6s role=web-serviceHow does the service know which pod? Look at Endpoints (the list of pod addresses the service sends traffic to):
kubectl describe svc web-service -n facebookSelector: role=web-service
IP: 10.110.135.144
Port: <unset> 80/TCP
TargetPort: 80/TCP
Endpoints: 192.168.19.69:80The selector role=web-service matched the pod's label, so the pod's IP is in Endpoints.
Test it from another pod
Start a small test pod (busybox, a tiny Linux image with basic tools) in the same namespace. sleep 3600 keeps it alive for an hour:
kubectl run test-pod --image=busybox:1.37 -n facebook --restart=Never -- sleep 3600
kubectl wait --for=condition=Ready pod/test-pod -n facebook --timeout=120s
Call the service by its name (wget -qO- downloads a web page and prints it):
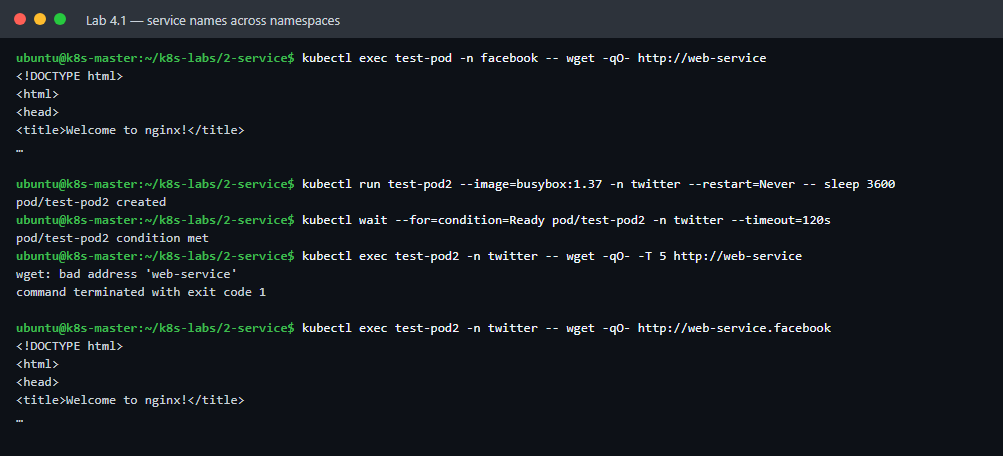
kubectl exec test-pod -n facebook -- wget -qO- http://web-serviceYou get the nginx welcome page HTML, including <title>Welcome to nginx!</title>. 🎉
Service names and namespaces
Now try from a pod in a different namespace:
kubectl run test-pod2 --image=busybox:1.37 -n twitter --restart=Never -- sleep 3600
kubectl wait --for=condition=Ready pod/test-pod2 -n twitter --timeout=120s
kubectl exec test-pod2 -n twitter -- wget -qO- -T 5 http://web-service
wget: bad address 'web-service'
command terminated with exit code 1The short name only works inside the same namespace. From another namespace, add the namespace name:
kubectl exec test-pod2 -n twitter -- wget -qO- http://web-service.facebookNow it works. The full name is web-service.facebook.svc.cluster.local. This name-to-IP lookup is DNS, done by the coredns pods you saw in Part 2.
ℹ️ Can I open a ClusterIP in my browser? No. It only exists inside the cluster. That is what NodePort is for (next lab).
Clean up:
kubectl delete pod test-pod -n facebook
kubectl delete pod test-pod2 -n twitter
kubectl delete -f 1-clusterip-service.yaml
Lab 4.2: NodePort, open your app in the browser
cat <<'EOF' > 2-nodeport-service.yaml
# A pod + a NodePort service (open it in your browser on port 30080)
apiVersion: v1
kind: Pod
metadata:
 name: webserver
 namespace: twitter
 labels:
 role: web-service
spec:
 containers:
 - name: nginx
 image: nginx:1.29
 ports:
 - containerPort: 80
---
apiVersion: v1
kind: Service
metadata:
 name: web-service
 namespace: twitter
spec:
 type: NodePort
 selector:
 role: web-service
 ports:
 - port: 80
 targetPort: 80
 nodePort: 30080
EOF
kubectl apply -f 2-nodeport-service.yaml
kubectl get pod,svc -n twitter -o wideNAME TYPE CLUSTER-IP EXTERNAL-IP PORT(S) AGE SELECTOR
service/web-service NodePort 10.103.156.194 <none> 80:30080/TCP 1s role=web-service80:30080 = the service listens on port 80 inside the cluster and on port 30080 on every node.

Open it in your browser 🌐
Find your VMs' external IPs (in Cloud Shell, or on the VM instances page):
gcloud compute instances list --format="table(name,networkInterfaces[0].accessConfigs[0].natIP)"On your laptop, open any of these (use your own IPs):
http://34.24.109.20:30080 (master)
http://104.196.152.32:30080 (worker1)
http://35.243.169.45:30080 (worker2)
All three show "Welcome to nginx!", even the nodes where the pod is not running. kube-proxy forwards the traffic to the right node.
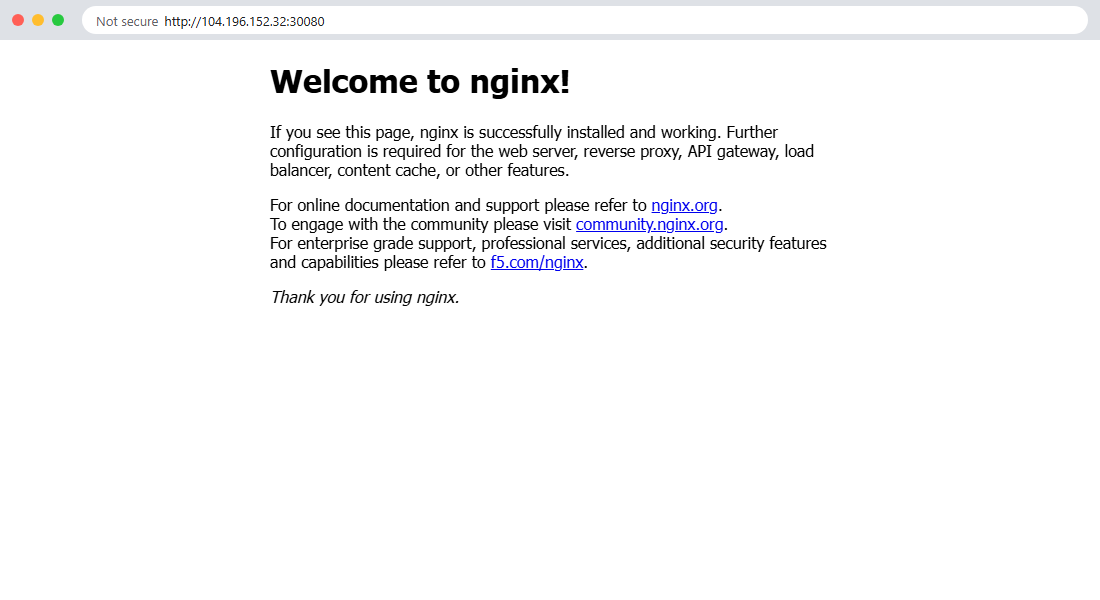
🪤 Beginner trap: page does not load? Check the
k8s-allow-nodeportfirewall rule (Part 1, step 1.6), and typehttp://, nothttps://.
Leave this running and continue.
Lab 4.3: 4 pods, 4 services, 4 different nginx versions
Each service uses the app label to pick exactly one pod.
cat <<'EOF' > 3-multiple-pods-services.yaml
# 4 pods, each a different nginx version, and 4 NodePort services.
# Each service picks ONE pod using its "app" label.
apiVersion: v1
kind: Pod
metadata:
 name: webserver1
 namespace: facebook
 labels:
 role: web-service
 app: v1
spec:
 containers:
 - name: nginx
 image: nginx:1.29
 ports:
 - containerPort: 80
---
apiVersion: v1
kind: Pod
metadata:
 name: webserver2
 namespace: facebook
 labels:
 role: web-service
 app: v2
spec:
 containers:
 - name: nginx
 image: nginx:alpine
 ports:
 - containerPort: 80
---
apiVersion: v1
kind: Pod
metadata:
 name: webserver3
 namespace: facebook
 labels:
 role: web-service
 app: v3
spec:
 containers:
 - name: nginx
 image: nginx:1.28
 ports:
 - containerPort: 80
---
apiVersion: v1
kind: Pod
metadata:
 name: webserver4
 namespace: facebook
 labels:
 role: web-service
 app: v4
spec:
 containers:
 - name: nginx
 image: nginx:1.27
 ports:
 - containerPort: 80
---
apiVersion: v1
kind: Service
metadata:
 name: web-service1
 namespace: facebook
spec:
 type: NodePort
 selector:
 app: v1
 ports:
 - port: 80
 nodePort: 30081
---
apiVersion: v1
kind: Service
metadata:
 name: web-service2
 namespace: facebook
spec:
 type: NodePort
 selector:
 app: v2
 ports:
 - port: 80
 nodePort: 30082
---
apiVersion: v1
kind: Service
metadata:
 name: web-service3
 namespace: facebook
spec:
 type: NodePort
 selector:
 app: v3
 ports:
 - port: 80
 nodePort: 30083
---
apiVersion: v1
kind: Service
metadata:
 name: web-service4
 namespace: facebook
spec:
 type: NodePort
 selector:
 app: v4
 ports:
 - port: 80
 nodePort: 30084
EOF
kubectl apply -f 3-multiple-pods-services.yaml
kubectl get pods -n facebook --show-labels
kubectl get svc -n facebookNAME READY STATUS RESTARTS AGE LABELS
webserver1 1/1 Running 0 13s app=v1,role=web-service
webserver2 1/1 Running 0 13s app=v2,role=web-service
webserver3 1/1 Running 0 13s app=v3,role=web-service
webserver4 1/1 Running 0 13s app=v4,role=web-service
NAME TYPE CLUSTER-IP EXTERNAL-IP PORT(S) AGE
web-service1 NodePort 10.104.59.223 <none> 80:30081/TCP 13s
web-service2 NodePort 10.111.87.43 <none> 80:30082/TCP 13s
web-service3 NodePort 10.111.193.110 <none> 80:30083/TCP 13s
web-service4 NodePort 10.102.92.143 <none> 80:30084/TCP 13sProve each port reaches a different version. This loop asks each port for its headers with curl -sI and keeps only the Server: line, which shows the nginx version:
for p in 30081 30082 30083 30084; do echo "port $p -> $(curl -sI http://localhost:$p | grep -i '^server')"; doneport 30081 -> Server: nginx/1.29.8
port 30082 -> Server: nginx/1.31.8
port 30083 -> Server: nginx/1.28.3
port 30084 -> Server: nginx/1.27.5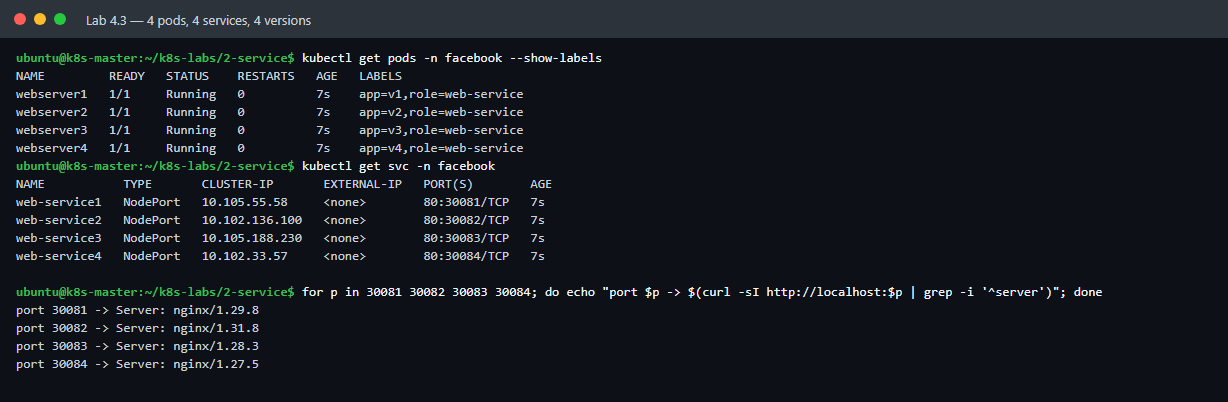
You can also open http://<any-node-external-ip>:30081 … :30084 in your browser.
Lab 4.4: LoadBalancer, and why it says <pending>
cat <<'EOF' > 4-loadbalancer-service.yaml
# type: LoadBalancer needs a cloud load balancer (GKE, EKS, AKS).
# On our kubeadm cluster EXTERNAL-IP stays <pending>. This is expected.
apiVersion: v1
kind: Pod
metadata:
 name: lb-webserver
 namespace: facebook
 labels:
 role: lb-web
spec:
 containers:
 - name: nginx
 image: nginx:1.29
 ports:
 - containerPort: 80
---
apiVersion: v1
kind: Service
metadata:
 name: lb-service
 namespace: facebook
spec:
 type: LoadBalancer
 selector:
 role: lb-web
 ports:
 - port: 80
EOF
kubectl apply -f 4-loadbalancer-service.yaml
Wait about 20 seconds, then:
kubectl get svc lb-service -n facebookNAME TYPE CLUSTER-IP EXTERNAL-IP PORT(S) AGE
lb-service LoadBalancer 10.111.174.48 <pending> 80:32254/TCP 20s
<pending> forever is normal here. A LoadBalancer service asks the cloud for a public load balancer. Managed clusters (GKE, EKS, AKS, which are Kubernetes services run for you by Google, Amazon and Microsoft) have a cloud controller that does this. Our kubeadm cluster on plain VMs does not.
Notice the port 80:32254: every LoadBalancer service also gets a random NodePort, so http://<node-ip>:32254 still works (use the number you see).
💡 To get real external IPs on a self-built cluster you add a load-balancer add-on (for example MetalLB on bare-metal or home labs). On Google Cloud VMs, MetalLB's simple L2 mode does not work, so for this lab we use NodePort.
Clean up Part 4
kubectl delete -f 4-loadbalancer-service.yaml
kubectl delete -f 3-multiple-pods-services.yaml
kubectl delete -f 2-nodeport-service.yaml
kubectl get all -n facebook
kubectl get all -n twitter
No resources found in facebook namespace.
No resources found in twitter namespace.✅ Part 4 done.
Part 5: Lab: ReplicaSets, self-healing and scaling (about 30 minutes)
Where: 🟩 run everything on k8s-master, plus your laptop's browser.
What is a ReplicaSet?
A ReplicaSet makes sure that a fixed number of identical pods (called replicas) is always running.
- A pod crashes or is deleted → the ReplicaSet creates a new one (this is called self-healing).
- You want more or fewer pods → change one number (scaling).
- It finds "its" pods with a label selector, the same idea as Services.
ReplicaSet (replicas: 4, selector: role=web)
 ├── pod role=web
 ├── pod role=web
 ├── pod role=web
 └── pod role=web
ℹ️ In real projects you usually create a Deployment, which creates the ReplicaSet for you and adds rolling updates (you already used one in the Part 2 smoke test). Learning ReplicaSets first makes Deployments easy.
kubectl create ns twitter --dry-run=client -o yaml | kubectl apply -f -
kubectl create ns facebook --dry-run=client -o yaml | kubectl apply -f -
mkdir -p ~/k8s-labs/3-replicaset
cd ~/k8s-labs/3-replicaset
Lab 5.1: A ReplicaSet with 1 pod, and self-healing
cat <<'EOF' > 1-single-replicaset.yaml
# A ReplicaSet that keeps exactly 1 nginx pod running
apiVersion: apps/v1
kind: ReplicaSet
metadata:
 name: nginx-replicaset
 namespace: twitter
spec:
 replicas: 1
 selector:
 matchLabels:
 role: webserver
 matchExpressions:
 - {key: version, operator: In, values: [v1, v2, v3]}
 template:
 metadata:
 labels:
 role: webserver
 version: v1
 tier: front-end
 spec:
 containers:
 - name: web
 image: nginx:1.29
 ports:
 - containerPort: 80
EOF
kubectl apply -f 1-single-replicaset.yaml
Understand the 3 important parts:
| Part | Meaning |
|---|---|
replicas: 1 |
How many pods to keep running |
selector |
Which pods belong to me: label role=webserver and version is v1, v2 or v3 |
template |
The "cookie cutter" used to create each pod. Its labels must match the selector. |
kubectl get rs,pods -n twitter -o wideNAME DESIRED CURRENT READY AGE CONTAINERS IMAGES SELECTOR
replicaset.apps/nginx-replicaset 1 1 1 1s web nginx:1.29 role=webserver,version in (v1,v2,v3)
NAME READY STATUS RESTARTS AGE IP NODE
pod/nginx-replicaset-hgwg8 1/1 Running 0 1s 192.168.19.76 k8s-worker1...rs is the short name for ReplicaSet. The pod name = ReplicaSet name + random letters (nginx-replicaset-hgwg8).
💥 Self-healing: delete the pod
Copy your pod name from the output above and delete it, or let this command find it for you (jsonpath picks one field out of kubectl's output, here the first pod's name):
kubectl delete pod -n twitter $(kubectl get pods -n twitter -l role=webserver -o jsonpath='{.items[0].metadata.name}')Check again a few seconds later:
kubectl get pods -n twitterNAME READY STATUS RESTARTS AGE
nginx-replicaset-9c2jc 1/1 Running 0 8sA new pod (new name, age only a few seconds) was created automatically. 🎉 The ReplicaSet wants 1 pod, so it always brings it back.
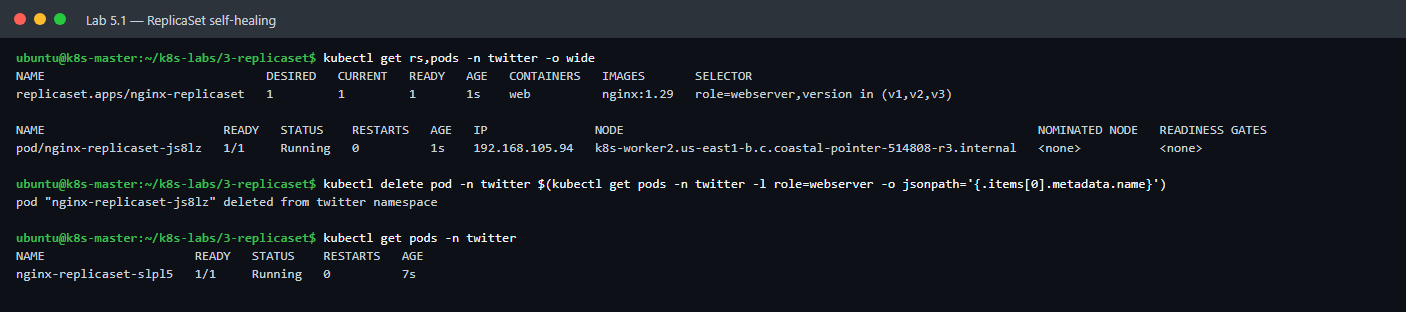
kubectl describe rs nginx-replicaset -n twitter | tail -5
kubectl delete -f 1-single-replicaset.yaml
💡 Deleting the ReplicaSet deletes its pods too. Deleting only a pod just makes the ReplicaSet create a new one.
Lab 5.2: 4 pods spread over 2 workers, then scale up and down
cat <<'EOF' > 2-multi-replicaset.yaml
# A ReplicaSet that keeps 4 httpd pods running across the workers
apiVersion: apps/v1
kind: ReplicaSet
metadata:
 name: httpd-replicaset
 namespace: facebook
spec:
 replicas: 4
 selector:
 matchLabels:
 role: web
 template:
 metadata:
 labels:
 role: web
 version: v1
 spec:
 containers:
 - name: web
 image: httpd:2.4
 ports:
 - containerPort: 80
EOF
kubectl apply -f 2-multi-replicaset.yaml
kubectl get rs -n facebook
kubectl get pods -n facebook -o wideNAME DESIRED CURRENT READY AGE
httpd-replicaset 4 4 4 5s
NAME READY STATUS RESTARTS AGE IP NODE
httpd-replicaset-57wzh 1/1 Running 0 5s 192.168.19.78 k8s-worker1...
httpd-replicaset-6bml4 1/1 Running 0 5s 192.168.19.77 k8s-worker1...
httpd-replicaset-97zjh 1/1 Running 0 5s 192.168.105.74 k8s-worker2...
httpd-replicaset-f2mts 1/1 Running 0 5s 192.168.105.75 k8s-worker2...Look at the NODE column: the scheduler spreads the pods over both workers. DESIRED is what you asked for, CURRENT is how many exist, and READY is how many are working.
Scale up to 6
kubectl scale rs httpd-replicaset -n facebook --replicas=6Wait about 10 seconds, then:
kubectl get rs,pods -n facebookNAME DESIRED CURRENT READY AGE
replicaset.apps/httpd-replicaset 6 6 6 15s2 new pods appear (their AGE is younger).
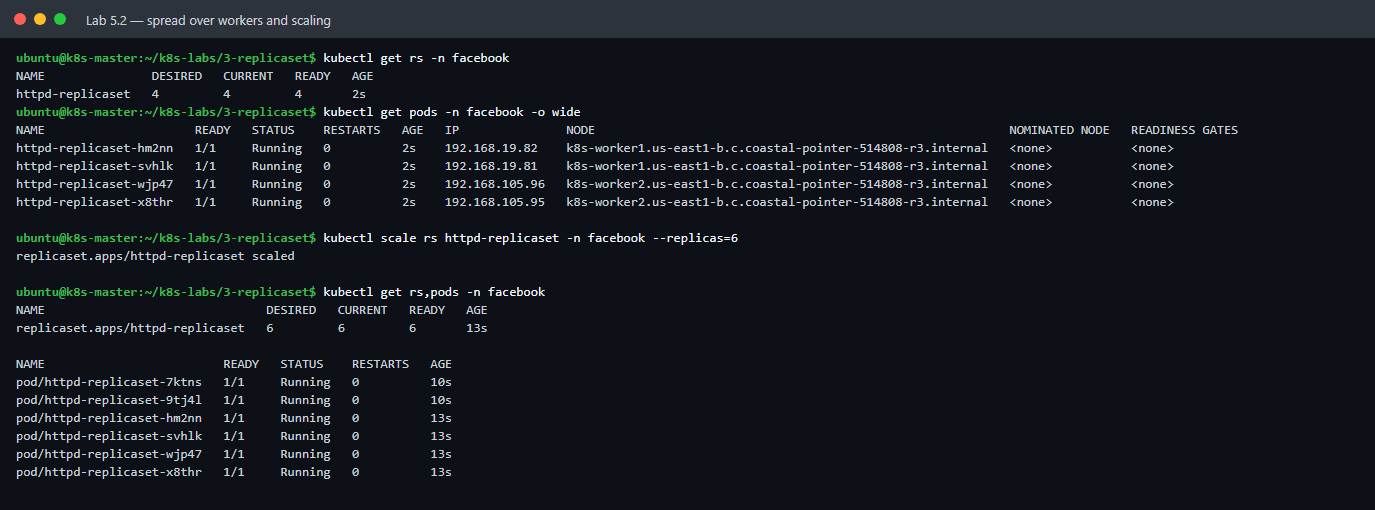
Scale down to 2
kubectl scale rs httpd-replicaset -n facebook --replicas=2Wait about 10 seconds, then:
kubectl get pods -n facebookNAME READY STATUS RESTARTS AGE
httpd-replicaset-57wzh 1/1 Running 0 26s
httpd-replicaset-97zjh 1/1 Running 0 26s🧠
kubectl scalevs the YAML file:kubectl scalechanges the running ReplicaSet right now. The YAML file still saysreplicas: 4, so if you runkubectl apply -f 2-multi-replicaset.yamlagain, it goes back to 4. Try it!
kubectl apply -f 2-multi-replicaset.yamlkubectl get rs httpd-replicaset -n facebookNAME DESIRED CURRENT READY AGE
httpd-replicaset 4 4 4 40sLab 5.3: Labels are powerful, add an extra pod with the same label
The ReplicaSet wants 4 pods with label role=web. What if you add a 5th pod with that label by hand?
cat <<'EOF' > 4-extra-pod-same-label.yaml
# A plain pod with the SAME label (role: web) as the ReplicaSet in 2-multi-replicaset.yaml.
# Watch what the ReplicaSet does with it.
apiVersion: v1
kind: Pod
metadata:
 name: extra-pod
 namespace: facebook
 labels:
 role: web
spec:
 containers:
 - name: web
 image: httpd:2.4
EOF
kubectl apply -f 4-extra-pod-same-label.yaml
kubectl get pods -n facebook
pod/extra-pod created
NAME READY STATUS RESTARTS AGE
extra-pod 0/1 Terminating 0 0s
httpd-replicaset-dj62j 1/1 Running 0 3s
...extra-pod is immediately terminated! Ask Kubernetes why. Events are Kubernetes' diary; this shows the last 3 entries written by the ReplicaSet:
kubectl get events -n facebook --field-selector involvedObject.kind=ReplicaSet | tail -37s Normal SuccessfulCreate replicaset/httpd-replicaset Created pod: httpd-replicaset-8bvvp
7s Normal SuccessfulCreate replicaset/httpd-replicaset Created pod: httpd-replicaset-b84k4
5s Normal SuccessfulDelete replicaset/httpd-replicaset Deleted pod: extra-pod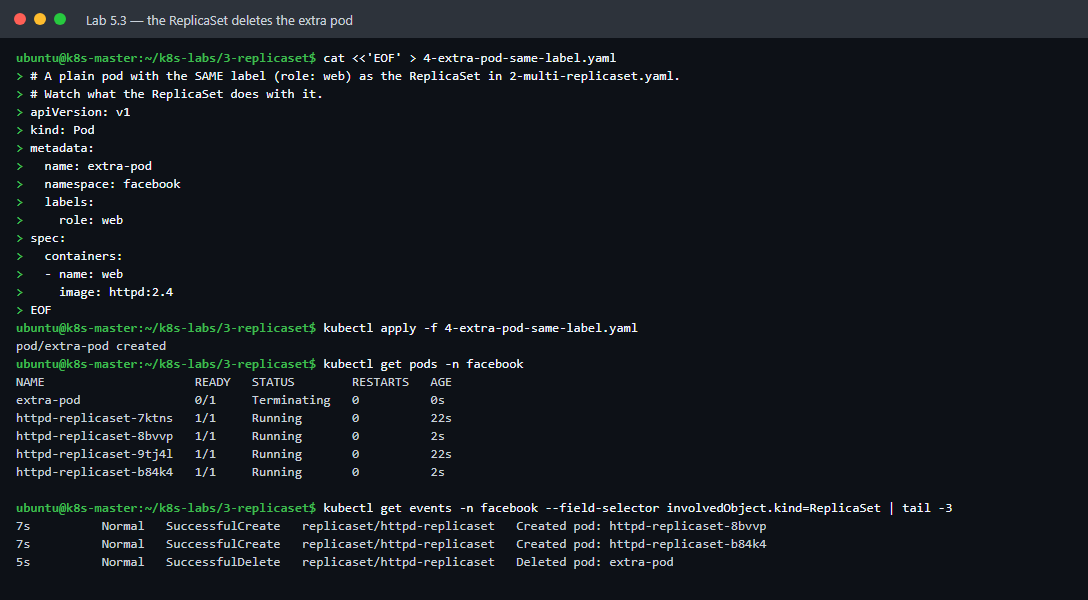
The ReplicaSet saw 5 pods with role=web, but it only wants 4, so it deleted one. A ReplicaSet counts every pod that matches its selector, even pods it did not create. That is why labels must be chosen carefully.
See who owns each pod:
kubectl get pods -n facebook -o custom-columns=NAME:.metadata.name,OWNER:.metadata.ownerReferences[0].nameNAME OWNER
httpd-replicaset-dj62j httpd-replicaset
httpd-replicaset-f66zf httpd-replicaset
httpd-replicaset-ggl4b httpd-replicaset
httpd-replicaset-rqfjg httpd-replicasetkubectl delete -f 2-multi-replicaset.yamlLab 5.4: ReplicaSet + Service = load balancing in your browser
Load balancing means spreading requests across several copies of an app, so no single copy does all the work. This app (nginxdemos/hello) prints which pod answered, so you can see it happen. A NodePort service spreads requests across the 3 pods.
cat <<'EOF' > 3-replicaset-with-service.yaml
# A ReplicaSet (3 pods) + a NodePort service that spreads traffic across them
apiVersion: apps/v1
kind: ReplicaSet
metadata:
 name: web-replicaset
 namespace: twitter
spec:
 replicas: 3
 selector:
 matchLabels:
 app: hello
 template:
 metadata:
 labels:
 app: hello
 spec:
 containers:
 - name: hello
 image: nginxdemos/hello:plain-text
 ports:
 - containerPort: 80
---
apiVersion: v1
kind: Service
metadata:
 name: hello-service
 namespace: twitter
spec:
 type: NodePort
 selector:
 app: hello
 ports:
 - port: 80
 nodePort: 30090
EOF
kubectl apply -f 3-replicaset-with-service.yaml
kubectl get rs,pods,svc -n twitter -o wideWait 10 seconds, then call the service 10 times and count which pod answered (sort | uniq -c counts identical lines):
for i in $(seq 1 10); do curl -s http://localhost:30090 | grep "Server name"; done | sort | uniq -c 3 Server name: web-replicaset-6wqps
4 Server name: web-replicaset-gmnhs
3 Server name: web-replicaset-k52qwAll 3 pods share the work. 🎉
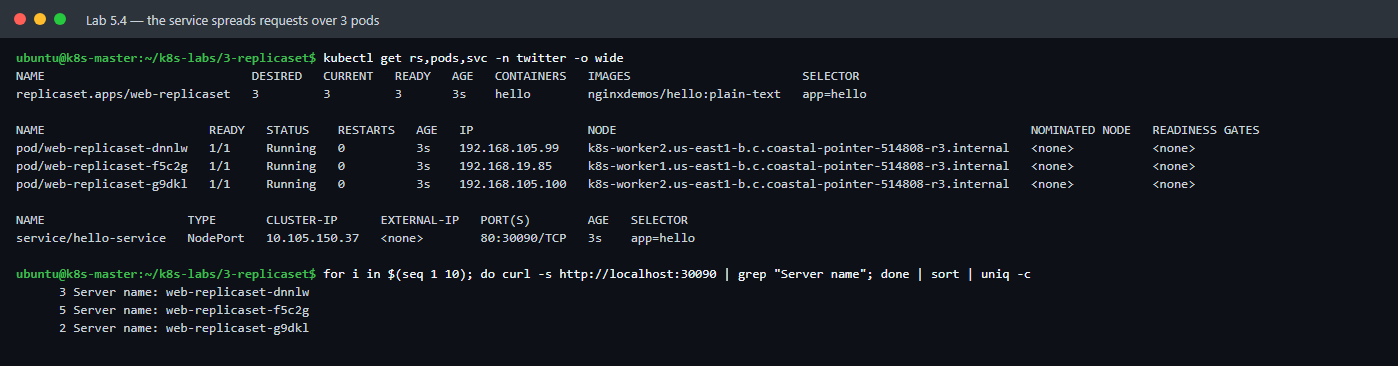
In your browser: open http://<any-node-external-ip>:30090 and press F5 (refresh) several times. The Server name: line changes between the 3 pods.
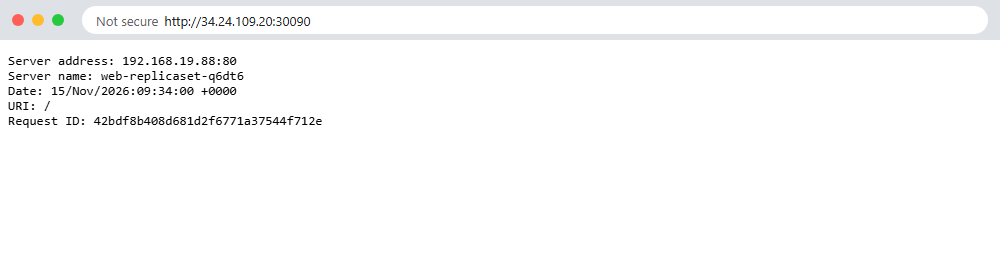
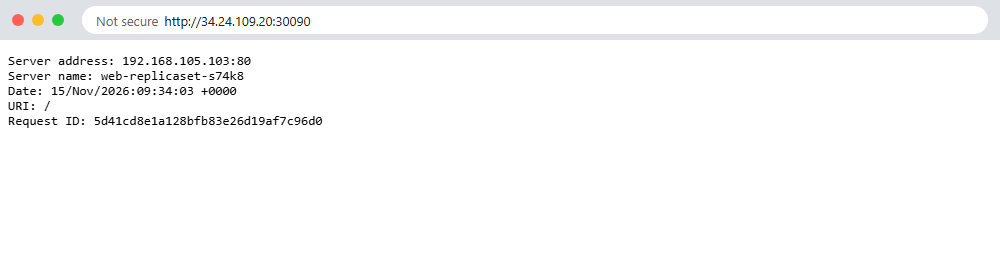
Self-healing + service together: delete a pod while the service is running:
kubectl delete pod -n twitter $(kubectl get pods -n twitter -l app=hello -o jsonpath='{.items[0].metadata.name}')Wait 10 seconds, then:
kubectl get pods -n twitter
for i in $(seq 1 10); do curl -s http://localhost:30090 | grep "Server name"; done | sort | uniq -c
The service automatically uses the new pod. Users never notice.
❓ Try it yourself: scale
web-replicasetto 5 withkubectl scale rs web-replicaset -n twitter --replicas=5, run the 10-request loop again, and count how many different pod names answer.
Clean up everything from the labs
kubectl delete -f 3-replicaset-with-service.yaml
kubectl delete ns twitter facebook
kubectl get ns
NAME STATUS AGE
default Active 18m
kube-node-lease Active 18m
kube-public Active 18m
kube-system Active 18m✅ All labs done!
Part 6: Cleanup, stop paying for the lab (5 minutes)
Google Cloud charges for VMs, disks and external IPs while they exist, even when you are not using them. Pick one option. Run these in Cloud Shell.
Option A: Pause, stop the VMs (keep everything for next time)
gcloud compute instances stop k8s-master k8s-worker1 k8s-worker2 --zone us-east1-b- You stop paying for the CPU and RAM. You still pay a little for the disks (~$0.01 per hour for all 3).
- Next time:
gcloud compute instances start k8s-master k8s-worker1 k8s-worker2 --zone us-east1-b, wait 2-3 minutes, thenkubectl get nodeson the master. - ⚠️ The external IPs change after a stop and start. Internal IPs stay the same, so the cluster keeps working.
Option B: Finished, delete everything
⚠️ This permanently deletes the 3 VMs and their disks. It cannot be undone.
gcloud compute instances delete k8s-master k8s-worker1 k8s-worker2 --zone us-east1-b --quiet
gcloud compute firewall-rules delete k8s-allow-ipip k8s-allow-nodeport --quiet
Check that nothing is left:
gcloud compute instances list
gcloud compute firewall-rules list --filter="name~^k8s-"
Both commands print Listed 0 items.
Delete the whole project (optional, the cleanest): open https://console.cloud.google.com/iam-admin/settings, click SHUT DOWN and type the project ID. Everything in the project is deleted after 30 days.
Option C: Rebuild the cluster on the same VMs
To practise the installation again without creating new VMs, reset Kubernetes on all 3 nodes (workers first, master last):
sudo kubeadm reset -f
sudo rm -rf /etc/cni/net.d $HOME/.kube
sudo systemctl restart containerd
Then start again from Part 2, Step 8 (master) and Step 12 (workers). Steps 1-7 do not need to be repeated.
Troubleshooting: if something goes wrong
| Problem | Fix |
|---|---|
kubeadm init says [ERROR NumCPU]: the number of available CPUs 1 is less than the required 2 |
Your VM is too small. Use e2-medium (2 vCPU). |
kubeadm init says [ERROR CRI]: container runtime is not running |
Repeat Part 2 Step 6, then sudo systemctl restart containerd. |
kubectl says The connection to the server localhost:8080 was refused |
You skipped Step 9, or you are on a worker. Run kubectl on the master. |
Worker join says couldn't validate the identity of the API Server or token not found |
The token expired (24 h). Run Step 11 on the master and use the new command. |
Worker join hangs at [preflight] Running pre-flight checks |
The worker cannot reach the master on port 6443. Use the master's internal IP and make sure all VMs are in the same VPC (default). |
Nodes stay NotReady |
Check Calico: kubectl get pods -n kube-system. Wait 2 minutes. If calico-node is not Running, run Step 10 again. |
| Pods on different workers cannot talk to each other | The k8s-allow-ipip firewall rule is missing (Part 1, step 1.6). |
| The purple "Which services should be restarted?" screen blocks you | Press Tab until <Ok> is highlighted, then Enter. Part 2 Step 1 prevents it. |
container not found ("db") in Lab 3.5 |
MySQL is still starting. Wait until the pod shows 2/2. |
psql: error: connection to server on socket ... failed in Lab 3.7 |
PostgreSQL is not ready yet. Wait 10 seconds and try again. |
| The NodePort page does not open in your browser | Check the k8s-allow-nodeport firewall rule and use http://, not https://. Right after a pod becomes Ready, wait about 10 seconds. |
LoadBalancer EXTERNAL-IP shows <pending> |
Expected on a kubeadm cluster. Use the NodePort shown in PORT(S) instead. |
| You want to start again on one node | sudo kubeadm reset -f on that node, then repeat from Step 8 (master) or Step 12 (worker). |
FAQ: questions beginners ask
Why is my LoadBalancer EXTERNAL-IP stuck on <pending>?
A LoadBalancer service asks the cloud for a public load balancer, and only managed clusters (GKE, EKS, AKS) have the controller that does that. On a kubeadm cluster it stays <pending>. Use the NodePort it also gets (Lab 4.4).
Do I need Docker to run Kubernetes?
No. Kubernetes only needs a container runtime. This guide installs just containerd.io (Part 2, Step 5), not the full Docker.
Why must I turn off swap? Kubernetes wants swap off so it can plan memory exactly. Part 2, Step 2 turns it off now and after every reboot.
My worker cannot join the cluster. What should I check?
Tokens expire after 24 hours, so print a fresh join command with sudo kubeadm token create --print-join-command (Step 11). Also make sure the join command uses the master's internal IP.
Can I open a ClusterIP service in my browser?
No. A ClusterIP only exists inside the cluster. Use a NodePort service and open http://<node-external-ip>:<nodeport> (Lab 4.2).
How much does this lab cost, and how do I stop paying? About US $0.13 per hour for the whole lab (about $3 per day) at the time of testing. Stop the VMs (Option A) or delete everything (Option B) in Part 6 when you finish.
What you learned, and where to go next
In Part A you learned what Kubernetes is, why every modern platform and every AI data centre depends on it, and what each part of a cluster does. In Part B, in about 2½ hours, you went from an empty Google Cloud account to a working 3-node Kubernetes cluster. You created namespaces and pods, read Events and logs to debug a broken pod, stored data with hostPath, reached pods through ClusterIP and NodePort services, saw why LoadBalancer stays <pending> on kubeadm, and watched a ReplicaSet heal itself, scale, and share traffic.
The natural next topics are Deployments (rolling updates on top of ReplicaSets), PersistentVolumes (storage that is not tied to one node) and Ingress (one entry point for many web apps).
Keep learning with CareerByteCode:
- 🤝 Join the free CareerByteCode community. It is free to join and free to stay. Post a screenshot of your 3
Readynodes, ask questions, and meet people learning the same things: CareerByteCode Community - 🎓 Go deeper with a live course: the Kubernetes Bootcamp takes you from fundamentals to production skills like Helm and GitOps. Browse all live courses and ByteClass live cohorts.
- 🤖 Heading into AI infrastructure? The Enterprise AI Factory course shows how GPU clusters are designed and run.
- 🧪 Practise with real projects on ByteLabs, for example Containerize and Run a Service with Docker Compose and, once you are comfortable with kubeadm, Entra ID SSO for Kubernetes on kubeadm.
Did this guide work for you? Tell us in the comments which step took you the longest, and we will make it even easier.
CareerByteCode Team
Get CareerByteCode Team's next blog by email
One email a week when they publish. Add the weekly Best of ByteBlog too. No spam, unsubscribe with one click.
We email you once to confirm. By subscribing you agree to the privacy policy.
💬 Comments (0)
Top · NewestSign in to comment